
[Manual Setting]
Overview
Manually enter the density balance adjustment values, and register them.
You can register a new adjustment value or correct existing data.
- Set the density balance adjustment value for each screen configured by this system. For more details about changing the screen type, refer to [Custom Screen].
Specifications
Category | Print Workflow, Adjustment / Maintenance | ||
Location | Machine | Control Panel | |
Printer driver | - | ||
Application | - | ||
Required options | - | ||
Required items | - | ||
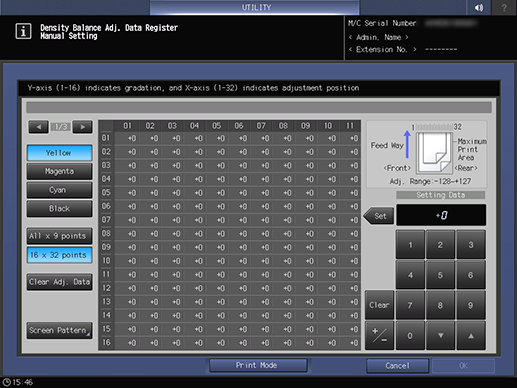
Setting items | [*] / [)] | Switches the screen to display. | |
[Yellow] | Select the color to be adjusted. | ||
[Magenta] | |||
[Cyan] | |||
[Black] | |||
[All e 9 points] | Select the mode to be adjusted. | ||
[16 e 32 points] | |||
[Clear Adj. Data] | Adjustment values of selected points and adjustment values of all points are set to 0. | ||
[Screen Pattern] | Select the screen to be adjusted. | ||
[Set] | Sets the numeric value entered using the on-screen keypad in the selected column. | ||
Keypad | Used to enter numeric values. | ||
[+] / [,] | Increases and decreases numeric values. | ||
[Clear] | Returns the entered numeric value to "0". | ||
[+ / -] | Sets the plus or minus of the numeric value. | ||
[Print Mode] | Outputs charts used for adjustment. | ||
Remarks | - | ||
Reference | - | ||
Screen access | Control panel - Utility/Counter - [Administrator Setting] - [System Setting] - [Expert Adjustment] - [Quality Adjustment] - [Density Balance Adjustment] - [Density Balance Data Reg/Del] - [Manual Setting] | ||
Procedure (New Registrations)
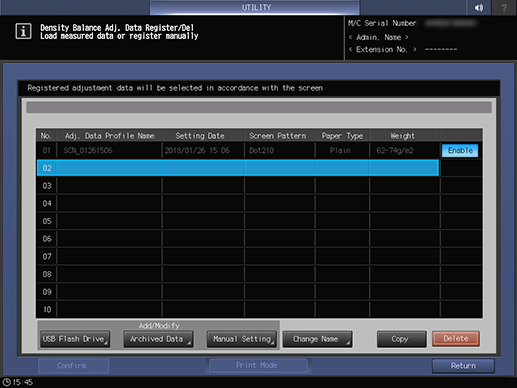
Up to 10 density balance adjustment values can be registered. Select an already registered number when overwriting.
The [Density Balance Adj. Data Register] screen is displayed. If you select a number that is already registered, the registered density balance adjustment value is displayed.


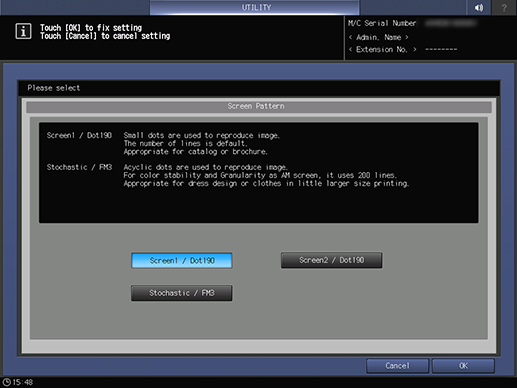
The screen type can be changed. For details, refer to [Custom Screen].


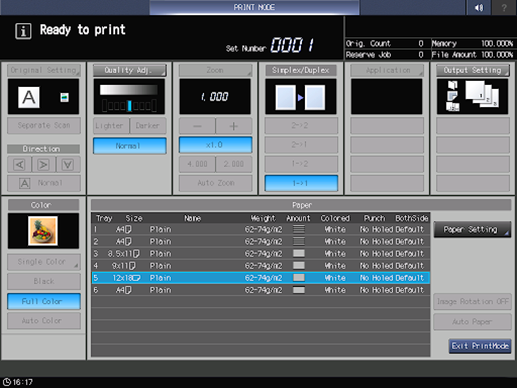
Select a paper feed tray loaded with paper of any of the following sizes: 12 e 18 w, SRA3 w, 13 e 19 w, 11 e 17 w or A3 w.

The chart containing the adjusted density balance is output.
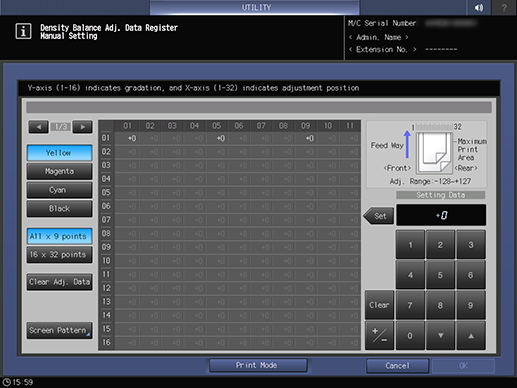
[All e 9 points] mode: Enter the 9 density values manually from the paper feed crossing direction divided into 32 points. (Horizontal axis [01], [05], [09], [13], [17], [21], [25], [29], [32]). System will automatically set the density value around it.
[16 e 32 points] mode: Manually enter density adjustment values of 32 points in the paper feed crossing direction and 16 points in the paper feed direction for a total of 512 points.

Select positive or negative of numerical value using [+ / -] and press [Set] to enter the value.
[Adj. Range:-128~+127]
Press [*] or [)]. to display the button at any position along the horizontal axis, and then select it.
When [16 e 32 points] mode is selected, if you press on the top column on the horizontal axis, the same numeric values can be entered with one entry by selecting the respective column beneath it.
Press [Clear] for setting to zero.
- Press [Clear Adj. Data] to set adjustment values of selected points as well as adjustment values of all points to zero. Exercise care when using.

Once the adjustments are complete, be sure to output the chart and check it. If the chart is not output, the density balance adjustment values will not be changed or registered, even if you press [OK] on the [Density Balance Adj. Data Register] screen.
Return to [Density Balance Data Reg/Del] screen. "NEW PROFILE" is displayed in [Adj. Data Profile Name].

For details, refer to [Change Name].
Procedure (Editing)
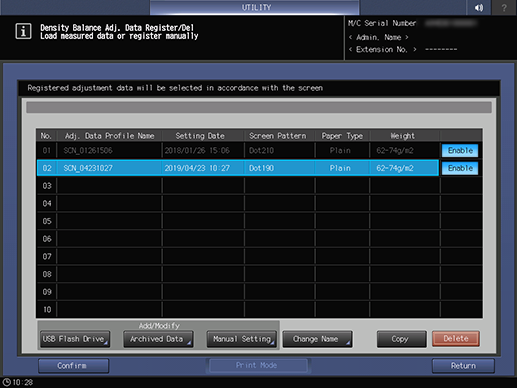
The [Density Balance Adj. Data Register] screen is displayed.


If the density balance adjustment value to be changed is colorimetric data by the colorimeter, the screen cannot be changed. [Screen Pattern] is inactive and cannot be selected.


The screen type can be changed. For details, refer to [Custom Screen].


Once the adjustments are complete, be sure to output the chart and check it. If the chart is not output, the density balance adjustment values will not be changed or registered, even if you press [OK] on the [Density Balance Adj. Data Register] screen.
Return to [Density Balance Data Reg/Del] screen.
[Adj. Data Profile Name] can be changed. For details, refer to [Change Name].


 in the upper-right of a page, it turns into
  and is registered as a bookmark.