
Perfect Binding Printing
What Is Perfect Binding Printing?
Automatically bundles paper which has been printed on both sides, applies glue along the spine, wraps a cover around, and then binds it.
- Add a cover using already printed paper and bind the document (blank cover mode)
- Add a cover using paper printed with a 2 in 1 cover image (2 in 1 cover image mode)
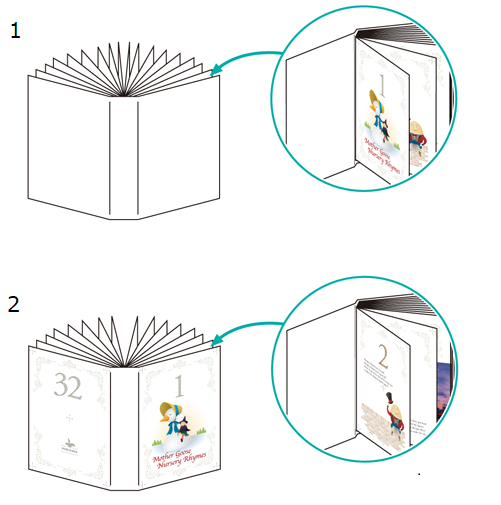
The following is recommended
- When you want to bind an original with a magazine or pamphlet-like finish
- When you want to bind using a separately prepared cover sheet
- Depending on the system settings, it may not be possible to perform bookbinding, or printing may be performed without bookbinding. Check the settings below in [Perfect Binder Setting] .
- [Usable Paper Weight Select]: Paper weight settings for the body and cover
- [Paper Count Limit for PB]: Minimum and maximum sheet number settings for perfect binding
- [Unfitting Cover Stop]: System pause settings for when the cover length is not applicable
- For details about [Perfect Binder Setting], refer to [Perfect Binder Setting].
Target Jobs
Does not depend on the file format.
Target Tools
Touch panel (machine store jobs) | Printer driver | AccurioPro Print Manager | Machine hot folder | AccurioPro Hot Folder |
|---|---|---|---|---|
- | . | . | . | . |
Procedure for Perfect Binding (Blank Cover Mode)
- The weight of the paper that can be used for perfect binding is 62 g/m2 to 105 g/m2/16 lb Bond to 28 lb Bond for the body, and 81 g/m2 to 216 g/m2/22 lb Bond to 57 lb Bond for the cover.
- The paper used for the cover is not A3-sized paper that is double the size of A4-sized paper. Make sure to take into account the width of the spine. (A custom size (Width 307.0 mm e Height 430.0 mm/Width 12.09" e Height 16.93") is used here.)
- The actual screen displayed may differ depending on the application version or revision, and the environment you are using.
Open the original in the application, and click [Print] in the [File] menu.
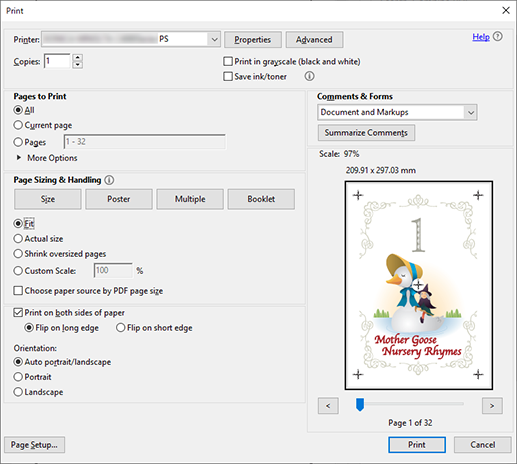
Select the printer to use for printing, and click [Properties].
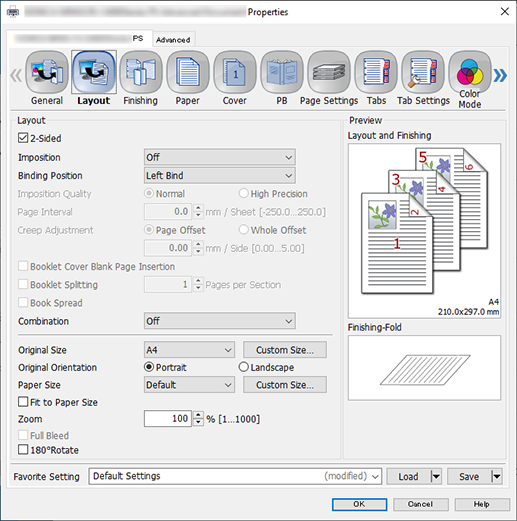
Configure the settings for the body.
Select the [Layout] tab, and configure the following items.
Item | Setting |
|---|---|
[2-Sided] | Add check mark |
[Binding Position] | [Left Bind] |
[Original Size] | [A4] |
[Original Orientation] | [Portrait] |
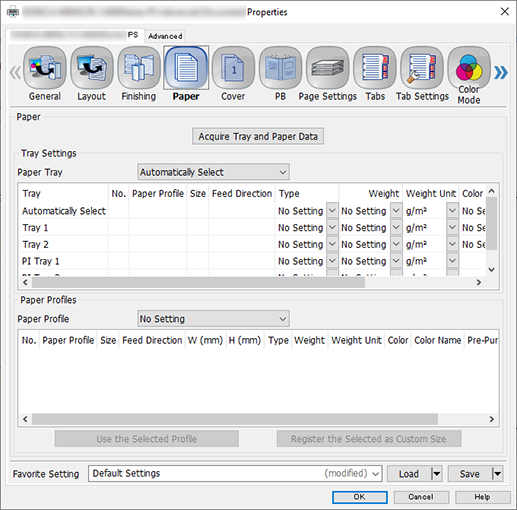
Select the [Paper] tab, and click [Acquire Tray and Paper Data].
A " " is displayed if tray/paper information is successfully obtained.
A " " is displayed if you were unable to acquire tray/paper information. Check to see if parts such as the optional paper feed tray are mounted properly.
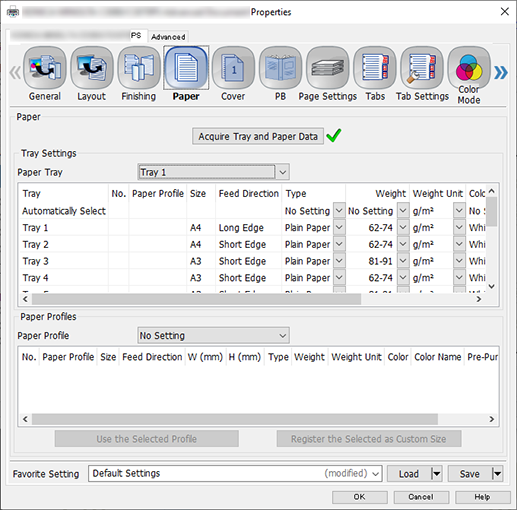
In [Paper Tray], select a paper feed tray in which A4 paper for the body (long edge) has been loaded.
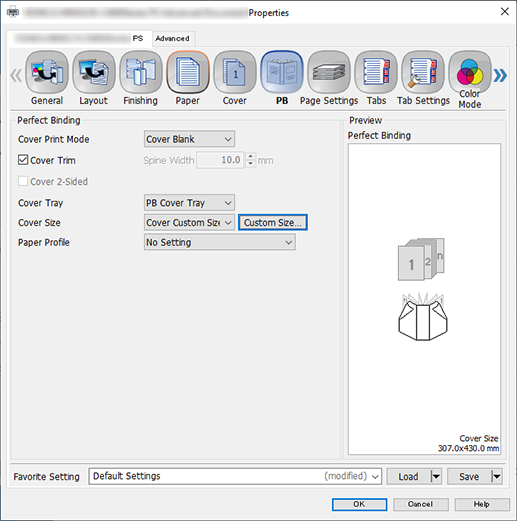
Configure the settings for the cover.
Select the [PB] tab, configure the following items, and click [OK].
Item | Setting Value |
|---|---|
[Cover Print Mode] | [Cover Blank] |
[Cover Trim] | Add check mark |
[Cover Tray] | [PB Cover Tray] |
[Cover Size] | Click [Custom Size...], and configure to [Width] (307.0 mm/12.09"), [Height] (430.0 mm/16.93") |

Enter the [Copies] you want to print on the [Print] screen, and click [Print].
Procedure for Perfect Binding (2 in 1 Cover Image Mode)
- You cannot use the cover tray of Perfect Binder PB-503 when in 2 in 1 cover image mode.
- The weight of the paper that can be used for perfect binding is 62 g/m2 to 105 g/m2/16 lb Bond to 28 lb Bond for the body, and 81 g/m2 to 216 g/m2/22 lb Bond to 57 lb Bond for the cover.
- The paper used for the cover is not A3-sized paper that is double the size of A4-sized paper. Make sure to take into account the width of the spine. (A custom size (Width 307.0 mm e Height 430.0 mm/Width 12.09" e Height 16.93") is used here.)
- The actual screen displayed may differ depending on the application version or revision, and the environment you are using.
Open the original in the application, and click [Print] in the [File] menu.

Select the printer to use for printing, and click [Properties].

Configure the settings for the body.
Select the [Layout] tab, and configure the following items.
Item | Setting |
|---|---|
[2-Sided] | Add check mark |
[Binding Position] | [Left Bind] |
[Original Size] | [A4] |
[Original Orientation] | [Portrait] |

Select the [Paper] tab, and click [Acquire Tray and Paper Data].
A " " is displayed if tray/paper information is successfully obtained.
A " " is displayed if you were unable to acquire tray/paper information. Check to see if parts such as the optional paper feed tray are mounted properly.

In [Paper Tray], select a paper feed tray in which A4 paper for the body (long edge) has been loaded.
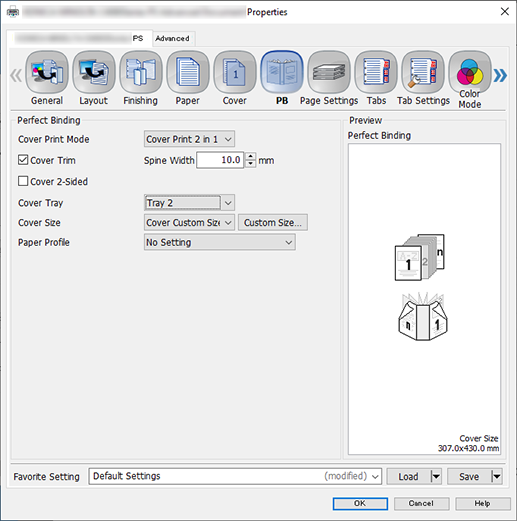
Configure the settings for the cover.
Select the [PB] tab, configure the following items, and click [OK].
Item | Setting Value |
|---|---|
[Cover Print Mode] | [Cover Print 2 in 1] |
[Cover Trim] | Add check mark |
[Cover Tray] | Select the paper feed tray loaded with the cover paper |
[Cover Size] | Click [Custom Size...], and configure to [Width] (307.0 mm/12.09"), [Height] (430.0 mm/16.93") |

Enter the [Copies] you want to print on the [Print] screen, and click [Print].


 in the upper-right of a page, it turns into
  and is registered as a bookmark.