
[Front] Adjustment
Procedure
1
Press [Paper Setting] on the [MACHINE] screen.
2
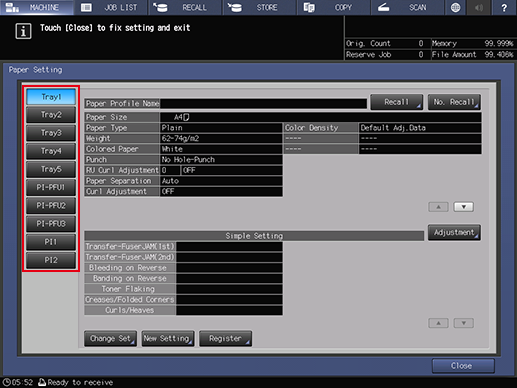
Press the tray loaded with the paper which you want to perform the adjustments with.
3
Press [Recall].
4
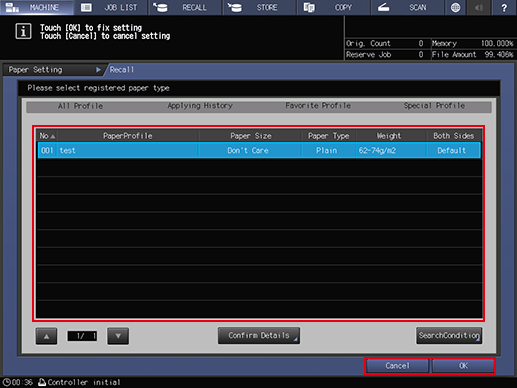
Select the paper brand name ([Paper Profile]), [Paper Size], [Paper Type] and [Paper Profile] for the [Weight] that is the same as the paper to be adjusted, and press [OK].
If there is no [Paper Profile] to select, press [Cancel].
For a [Paper Profile] that has [Paper Size] or [Direction] information that is different than the paper loaded in the tray, the option is grayed out (inactive) and you cannot select it.
5
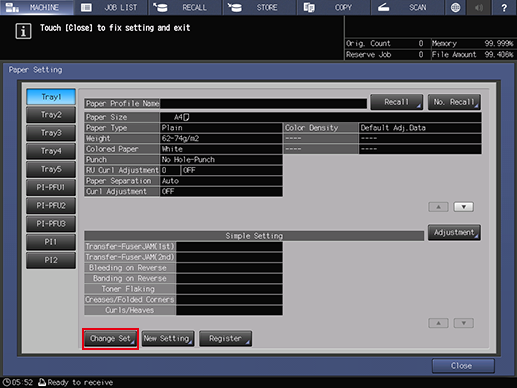
Press [Change Set].
6
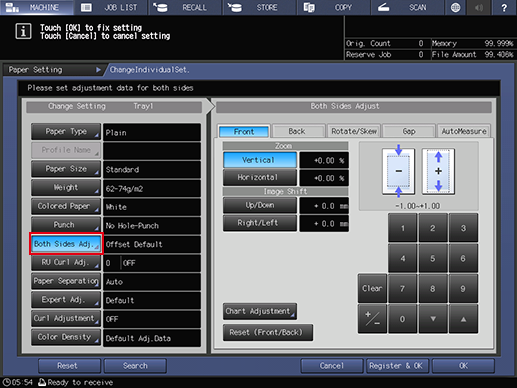
Press [Both Sides Adj.].
There is a motor sound with which the Tray bottom plate raises. When the motor sound stops and you pull out the tray, Tray bottom plate rises to the top.
7
Check that [Front] is selected, and then press [Chart Adjustment].
8

Press [Print Mode].
Rotate the Bottom plate fixing knob counterclockwise to loosen it, slide it away from you, and rotate it clockwise in that position to lock it. The Tray bottom plate goes down.
9
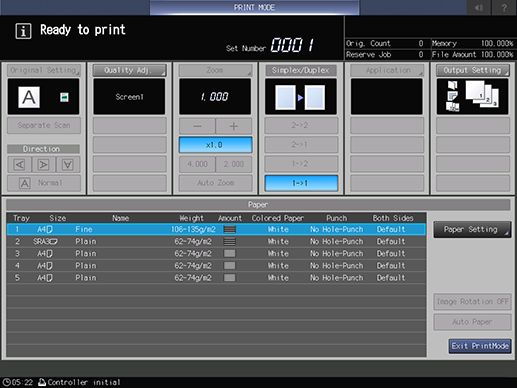
Press Start on the Control panel when the [PRINT MODE] screen is displayed.
A chart is output. Output 3 charts.
10
Press [Exit PrintMode].
11
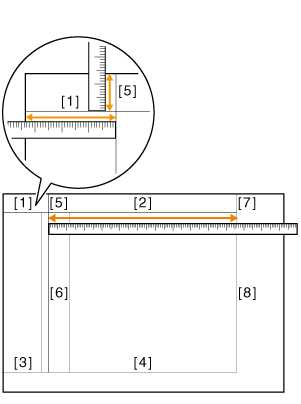
Check the lengths of items [2], [4], [6] and [8] on the 2nd and 3rd output charts.
Note down the measured length so that you do not forget it.
If the lengths of [2], [4], [6], and [8] fall within the range detailed below, press [Close], and then [OK] to complete the adjustment.
If the lengths of [2], [4], [6], and [8] fall outside of the range detailed below, measure the lengths of the remaining [1], [3], [5], and [7], and proceed to Step 12.
[2]: 200 mm -0.3 mm to +0.3 mm
[4]: 200 mm -0.3 mm to +0.3 mm
[6]: 200 mm -0.3 mm to +0.3 mm
[8]: 200 mm -0.3 mm to +0.3 mm
12
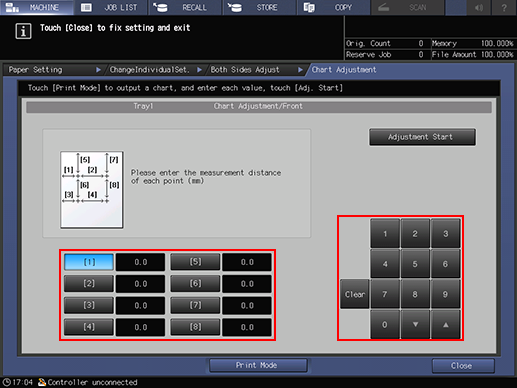
Press the number for each point, and enter the measured lengths using the on-screen numeric keypad.
Press [Clear] if you want to reset the values.
13
Press [Adjustment Start] after entering the values.
14
Re-output charts of the front side adjustments, and check the lengths of items [2], [4], [6] and [8] on the 2nd and 3rd output charts.
Repeat Steps 11 through 14 until the lengths of [2], [4], [6] and [8] match the values in the range detailed below.
[2]: 200 mm -0.3 mm to +0.3 mm
[4]: 200 mm -0.3 mm to +0.3 mm
[6]: 200 mm -0.3 mm to +0.3 mm
[8]: 200 mm -0.3 mm to +0.3 mm
15
Press [OK] to complete the adjustments.
Press [Register & OK] when making adjustments on the front side for a new paper brand name, weight, or size.
 in the upper-right of a page, it turns into
  and is registered as a bookmark.