
Trim Printing
What Is Trim Printing?
If Trimmer Unit TU-510 is mounted, trimming will be applied to copy jobs or print jobs in the same way as printing.
You can register advanced settings for the trimming function in advance as a trimmer profile. You can recall and apply the trimmer profiles as and when needed to streamline the performing of trimming operations. For details about the trimmer profile, refer to [Trimmer Profile].

NOTICE
- Specifications of Trimmer Unit TU-510 vary depending on the production period. For details, refer to Trimmer Unit TU-510.

Tips
- For details about the available paper sizes and other specifications, refer to [Trimmer Profile] or Trimmer Unit TU-510.
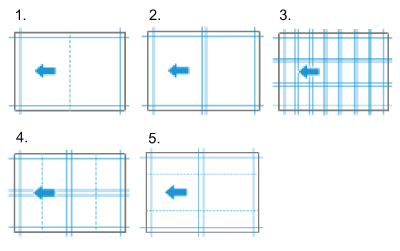
The 5 types of trimming mode operation are detailed below.
No. | Mode | Overview | Available paper size | Finished Size Post-Cutting | Usable Paper Weight | Trays Applicable for Output |
|---|---|---|---|---|---|---|
1 | [Four Edge Trim] | Cuts 4 sides of paper. *Can also be used to apply creases and perforations. | Widthwise 140.0 mm to 330.2 mm, lengthwise 153.0 mm to 1,300.0 mm/Widthwise 5.51" to 13", lengthwise 6.02" to 51.18" To set [Perforation]: (widthwise) 140.0 mm to 330.2 mm, (lengthwise) 153.0 mm to 487.7 mm / (widthwise) 5.51" to 13", (lengthwise) 6.02" to 19.20" | (Width) 120.0 mm to 314.2 mm, (Length) 133.0 mm to 1280.0 mm / (Width) 4.72" to 12.37", (Length) 5.24" to 50.39" | 50 g/m2 to 400 g/m2/14 lb Bond to 106 lb Bond (Crease: 80 g/m2 to 400 g/m2/21 lb Bond to 106 lb Bond) | Trimmer Unit TU-510Secondary (sub) tray, subsequent finisher (Finishing paper length is from 133.0 mm / 5.24" to 488.0 mm / 19.21") (If [Perforation] is set, subsequent finisher cannot be used.) |
2 | [Multiple Cutting] | Cuts paper to 2 sheets. *You can also cut the paper into same-sized sheets by configuring the setting (half-cut). | Widthwise 140.0 mm to 330.2 mm, lengthwise 266.0 mm to 487.7 mm / Widthwise 5.51" to 13", lengthwise 10.47" to 19.20" (Width 313.0 mm to 330.2 mm, Length 440.0 mm to 459.0 mm / Width 12.32" to 13", Length 17.32" to 18.07" (when creating A4), Width 295.4 mm to 330.2 mm, Length 451.8 mm to 470.8 mm / Width 11.63" to 13", Length 17.79" to 18.54" (when creating Letter)) | A4 (297.0 mm e 210.0 mm / 11.69" e 8.27") or Letter (279.4 mm e 215.9 mm / 11.71" e 8.50") | 64 g/m2 to 400 g/m2 / 17 lb Bond to 106 lb Bond | Trimmer Unit TU-510Secondary (sub) tray, subsequent finisher |
3 | [Card Cutting] | Cuts paper to the card size. *The partition paper can also be inserted. | WY1: Widthwise 287.0 mm to 330.2 mm, lengthwise 370.0 mm to 457.2 mm/Widthwise 11.30" to 13", lengthwise 14.57" to 18" WY2: Widthwise 210.0 mm to 330.2 mm, lengthwise 279.4 mm to 470 mm/Widthwise 8.27" to 13", lengthwise 11.00" to 18.50" | Widthwise 85.0 mm to 92.0 mm, lengthwise 50.0 mm to 56.0 mm/Widthwise 3.35" to 3.62", lengthwise 1.97" to 2.20" | 177 g/m2 to 300 g/m2 / 48 lb Bond to 81 lb Bond | Card tray of Trimmer Unit TU-510 |
4 | [1x1-3x3 Cutting(CR)] | Set trim and crease positions. | Widthwise 200.0 mm to 330.2 mm, lengthwise 143.0 mm to 487.7 mm / Widthwise 7.87" to 13", lengthwise 5.63" to 19.20" | Widthwise 85.0 mm / 3.35" or higher, lengthwise 133.0 mm / 5.24" | 128 g/m2 to 300 g/m2 / 34 lb Bond to 81 lb Bond (Coated paper: 157 g/m2 to 300 g/m2 / 42 lb Bond to 81 lb Bond) | Secondary (sub) tray of Trimmer Unit TU-510 |
5 | [1x1-1x3 Cutting(PE)] | Set trim and perforation position. | Widthwise 210.0 mm to 330.2 mm, lengthwise 143.0 mm to 487.7 mm / Widthwise 8.27" to 13", lengthwise 5.63" to 19.20" | Widthwise 85.0 mm / 3.35" or higher, lengthwise 133.0 mm / 5.24" | 128 g/m2 to 300 g/m2 / 34 lb Bond to 81 lb Bond (Coated paper: 157 g/m2 to 300 g/m2 / 42 lb Bond to 81 lb Bond) | Secondary (sub) tray of Trimmer Unit TU-510 |
Recommendations
Use trim printing in circumstances such as these.
When you want to create catalogs, book covers, pamphlets, etc.
When you want to create various types of card (business cards, etc.)
When you want to trim to special paper sizes

Reference
- For details about paper sizes, refer to [Trimmer Profile].
- For details about the trimming mode, refer to [Create].
Target Jobs
Hold jobs, copy jobs, print jobs
Target Tools
Touch panel (machine store jobs) | Printer Driver | AccurioPro Print Manager | Machine Hot Folder | AccurioPro Hot Folder |
|---|---|---|---|---|
. | . | . | . | e |
Assumed Operating Environment
Item Name | Contents |
|---|---|
OS | Windows 10 |
Application | Adobe Acrobat Reader DC |
Printer Driver | PS Plug-in Driver |
Option | Trimmer Unit TU-510 |
NOTICE
- The actual screen displayed may differ depending on the application version or revision, and the environment you are using.
Tips
- When setting up the printer driver, make sure you check that none of the previous settings are left in any of the item tabs. If any of the previous settings do remain, make sure you clear them.
What Is Trimmer Unit TU-510?
Mount Trimmer Unit TU-510 to the system to trim paper before printing.
Mount the options detailed below inside Trimmer Unit TU-510 to provide further special trimming functionality.
Option | Description |
|---|---|
Creaser Unit CR-102 | Adds creases (with a downward convex shape) to the paper. Creases can be added when performing four edge trimming or 1x1-3x3 trimming (CR). |
Creaser Unit CR-103 | Adds creases (with a upward convex shape) to the paper. Creases can be added when performing four edge trimming. |
Perforation Unit PE-101 | Adds transverse perforations to the paper. Perforations can be added when performing four edge trimming or 1x1-1x3 trimming (PE). |
Perforation Unit PE-102 | Adds lengthwise perforations to the paper. Perforation can be added when performing four edge trimming. |
Trimmer Unit TU-504 | Trims unnecessary sections of the multi-faced paper. Trim the paper bleed in the horizontal direction relative to the paper feed direction. |
Job Separator JS-507 | Stacks the paper trimmed to the card size onto the Card tray. Trimmer Unit TU-504 is necessary to trim to the card size. |
Trim Printing Workflow
1
Create and register trimmer profiles.
For details about accessing the profile creation screen, refer to "Access to Profile Creation Screen" (described after the procedure).
[FinisherManager] can display only Japanese or English. The English language screens are used for descriptions in languages that cannot be displayed.
For details about how to create and register profiles, refer to [Create] or Creating and Editing Trimmer Profiles.
2
Apply a registered trimmer profile to the job.
For details about the function to apply trimmer profiles when printing, refer to "Function to apply trimmer profiles when printing" (described after the procedure).
3
Print the job(s).
The trimming is performed and the job output.
Access to Profile Creation Screen
Access | Transition to Profile Creation Screen |
|---|---|
From the system’s Touch panel | Touch panel - [MACHINE] - [Trimmer Profile] - [Create] |
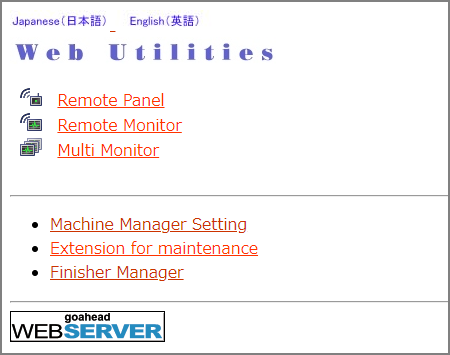
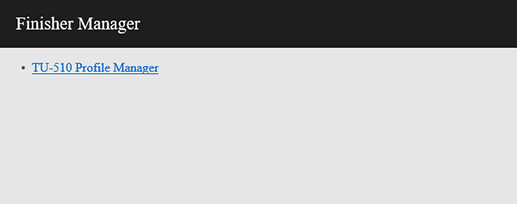
From the browser | With Web Utilities Web Utilities - Main Page - [Finisher Manager] - [TU-510 Profile Manager] - [Create] For details about how to access Web Utilities, refer to Web Utilities (the Machine). |
Function to apply trimmer profiles when printing
Function | Contents |
|---|---|
[Trim] function of [JOB LIST] | To apply a trimmer profile to a hold job, select [JOB LIST] and then [Trim], and then select the appropriate trimmer profile. For details, refer to [Trim]. |
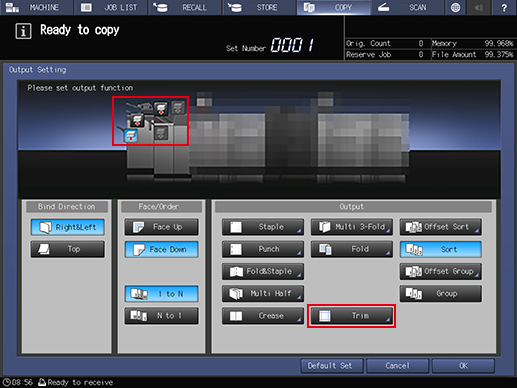
[Output Setting] function of [COPY] | To apply a trimmer profile to a copy job, select [Output Setting] and then [Trim], and then select the appropriate trimmer profile. For details, refer to [Trim]. |
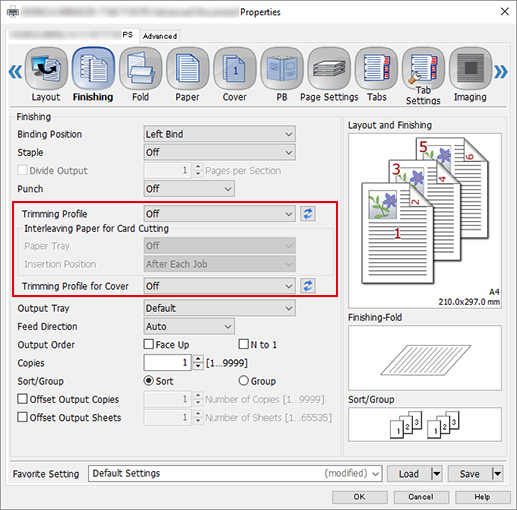
[Finishing] function of PS Plug-in Driver | To apply a trimmer profile to a print job, select the [Finishing] tab, and then configure the appropriate trimmer profile settings. For details, refer to [Finishing]. |
[Finishing] function of AccurioPro Print Manager | To apply a trimmer profile to a print job, select the [Finishing] tab, and then configure the appropriate trimmer profile settings. For details, refer to [Finishing]. |
Creating and Editing Trimmer Profiles
To create or edit a trimmer profile, you can do so using the system’s Touch panel, or by accessing and operating it from [FinisherManager] of Web Utilities. The method for creating the profiles is the same.
[FinisherManager] can display only Japanese or English. The English language screens are used for descriptions in languages that cannot be displayed.
This section provides an example of how to create a trimmer profile after gaining access from Web Utilities.
Tips
- When accessed and operated from [FinisherManager] in Web Utilities, the dimension values and [PDF Download] functions are displayed on the profile creation screen. You can download the cutting image in PDF format by clicking the [PDF Download].
Reference
- For details about [PDF Download], refer to [PDF Download].
1
Launch your browser.
For details about the Web Utilities operating environment, refer to Web Utilities.
2
Access Web Utilities from the computer connected to the machine via the network.
URL: http://<IP address of the machine>:30091/
URL (SSL): https://<IP address of the machine>:30092/
3
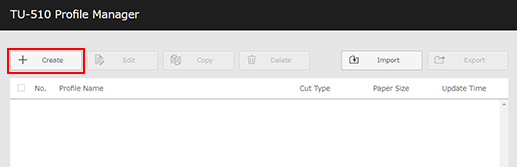
Click [FinisherManager].
4
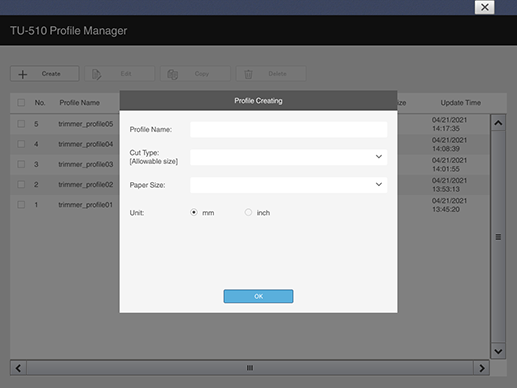
Click [TU-510 Profile Manager].
5
For details about the settings below, refer to each of the items below.
Four Edge Trim (Crease)
This section describes how to configure trimmer profiles for four edge trimming (crease).
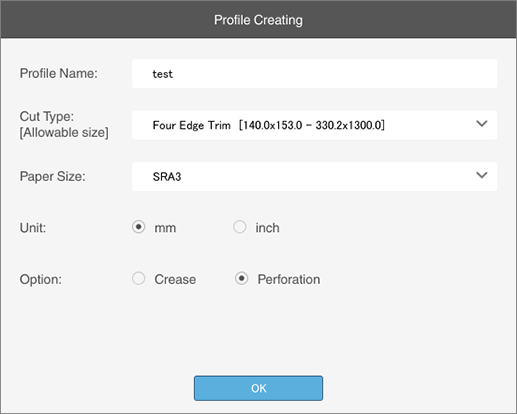
1
Click [Create].
2
Configure and set the [Profile Name] or [Cut Type] ([Four Edge Trim]), [Paper Size], [Unit], [Option] ([Crease]).
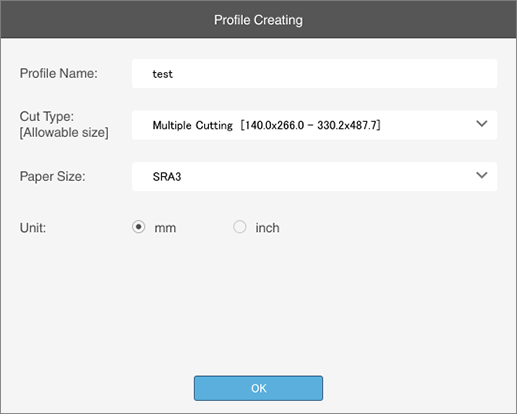
Usable Paper Size: (Width) 140.0 mm to 330.2 mm, (Length) 153.0 mm to 1300.0 mm / (Width) 5.51" to 13", (Length) 6.02" to 51.18"
3
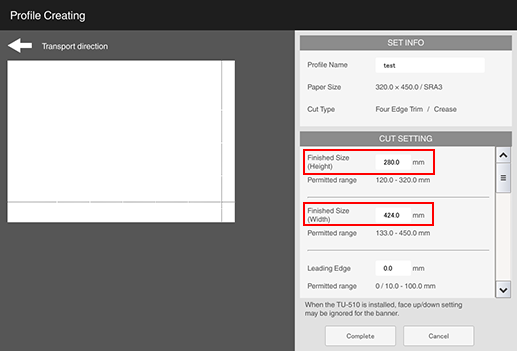
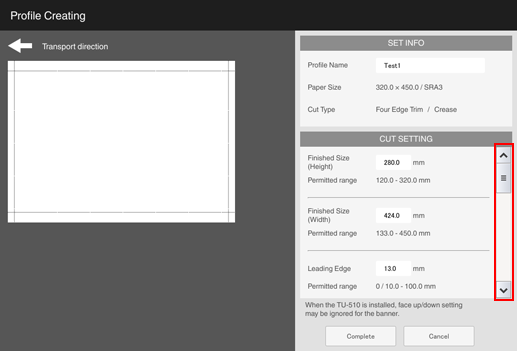
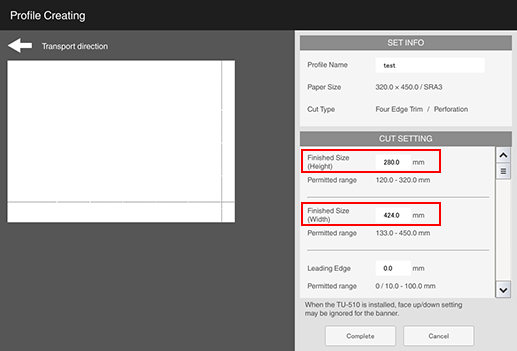
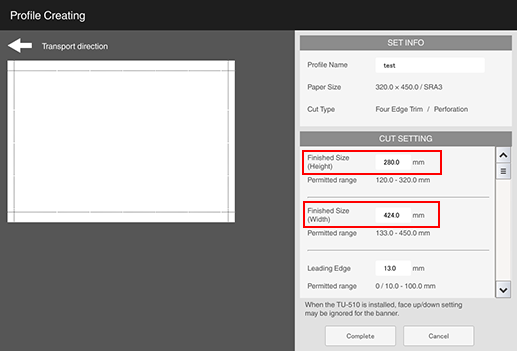
Enter the [Finished Size(Height)] and [Finished Size(Width)].
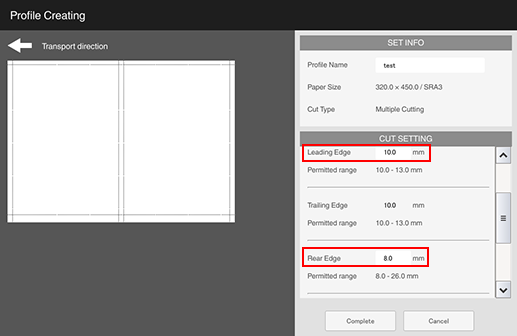
4
Enter the [Leading Edge] (amount of the lead edge to be cut) and [Rear Edge] (amount of top edge to be cut).
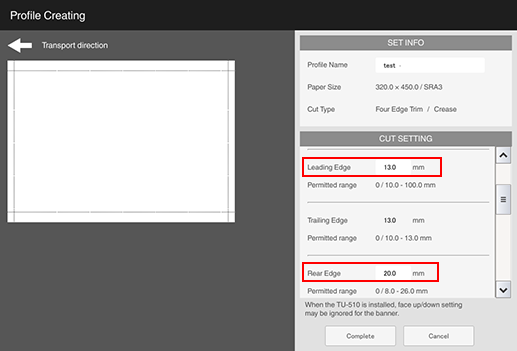
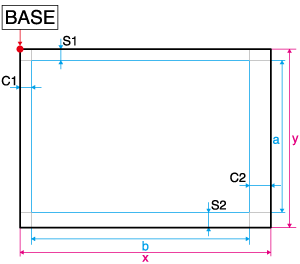
Decide the setting values for [Leading Edge] (C1) and [Rear Edge] (S1) as the starting points for the base points, as shown in the figure. Set the cutting position so that the size of the paper being used is cut to the desired finish size.
Tips
- There are limits on the setting values for [Finished Size(Height)] (a) or [Finished Size(Width)] (b), [Leading Edge] (C1), [Rear Edge] (S1). For details about limitations, refer to the "Four Edge Trim / Crease Limitations" (described after the procedure).
- Some items allow you to change the limits of the setting values. For changes, contact your service representative.
- An error message will be displayed when a value that does not fall within the applicable range is set, and hence the trimmer profile cannot be created. If an error message is displayed, check the input value or change the paper size being used. For details about the available paper size, refer to "Allowable Paper Sizes" (described after the procedure).
- When you enter [Leading Edge] (C1) and [Rear Edge] (S1), [Trailing Edge] (C2) and [Front Edge] (S2) are set automatically. Exceeding the [Trailing Edge] and [Front Edge] limitations will also result in an error. Be sure to take note of the limitations for each of the various setting values.
5
Enter [Downward Crease1] to [Downward Crease5] and [Upward Crease1] to [Upward Crease5] as necessary.
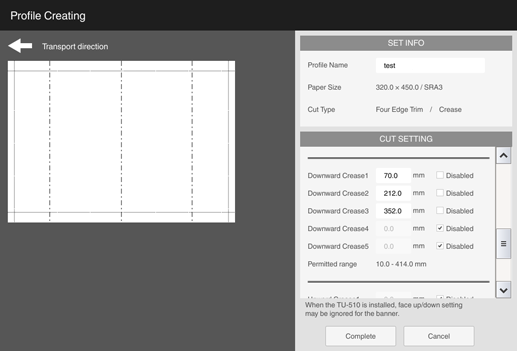
Up to 5 lower convex creases and upper convex creases can be set respectively, depending on the finish size and setting position.
The crease positions are set at 10.0 mm / 0.39" or more from the trim area, and the crease intervals at 1.0 mm / 0.04" or more.
6
This section shows example settings for [Four Edge Trim / Crease].
For details about setting examples, refer to "Settings Example 1" to "Settings Example 3" (described after the procedure).
7
Click [Complete].
The created trimmer profile is saved.
Allowable Paper Sizes | ||
|---|---|---|
x | Paper size (horizontal width) | 153.0 mm to 1300.0 mm / 6.02" to 51.18" |
y | Paper size (vertical width) | 140.0 mm to 330.2 mm / 5.51" to 13" |
Four Edge Trim / Crease Limitations | ||
|---|---|---|
a | [Finished Size(Height)] | 120.0 mm / 4.72" or more |
b | [Finished Size(Width)] | 133.0 mm / 5.24" or more |
C1 | [Leading Edge] (amount of lead edge to be cut) | 0 mm / 0" (None) or 10.0 mm to 100.0 mm / 0.39" to 3.94" |
C2 | [Trailing Edge] (amount of rear edge to be cut) | 0 mm / 0" (None) or 10.0 mm to 13.0 mm / 0.39" to 0.51" |
S1 | [Rear Edge] (amount of top edge to be cut) | 0 mm / 0" (none) or 8.0 mm to 30.0 mm / 0.32" to 1.18" Set the difference between [Rear Edge] (amount of top edge to be cut) and [Front Edge] (amount of bottom edge to be cut) within 10.0 mm / 0.39". Cutting only [Rear Edge] (amount of top edge to be cut) or only [Front Edge] (amount of bottom edge to be cut) is not possible. |
S2 | [Front Edge] (amount of bottom edge to be cut) | |
Settings Example 1 (Paper Size: SRA3, Units: mm) | |
|---|---|
[Profile Name] | Test1 |
[Paper Size] | 320.0 e 450.0 / SRA3 |
[Cut Type] | Four Edge Trim / Crease |
[Finished Size(Height)] | 280.0 |
[Finished Size(Width)] | 424.0 |
[Leading Edge] | 13.0 |
[Trailing Edge] | 13.0 (automatic setting) |
[Rear Edge] | 20.0 |
[Front Edge] | 20.0 (automatic setting) |
[Downward Crease1] to [Downward Crease5] | Disabled |
[Upward Crease1] to [Upward Crease5] | Disabled |
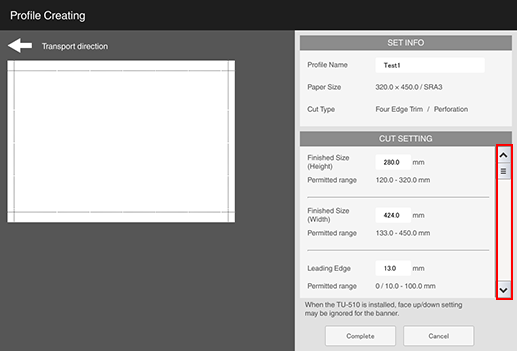
If the item you want to set is not displayed, scroll down the screen with the slider. | |
 | |
Settings Example 2 (Paper Size: SRA3, Units: mm) | |
|---|---|
[Profile Name] | Test2 |
[Paper Size] | 320.0 e 450.0 / SRA3 |
[Cut Type] | Four Edge Trim / Crease |
[Finished Size(Height)] | 280.0 |
[Finished Size(Width)] | 420.0 |
[Leading Edge] | 18.0 |
[Trailing Edge] | 12.0 (automatic setting) |
[Rear Edge] | 20.0 |
[Front Edge] | 20.0 (automatic setting) |
[Downward Crease1] | 70.0 |
[Downward Crease2] | 210.0 |
[Downward Crease3] | 350.0 |
[Downward Crease4] to [Downward Crease5] | Disabled |
[Upward Crease1] | 140.0 |
[Upward Crease2] | 280.0 |
[Upward Crease3] to [Upward Crease5] | Disabled |
If the item you want to set is not displayed, scroll down the screen with the slider. | |
 | |
Settings Example 3 (Paper Size: A4 SEF, Units: mm) | |
|---|---|
[Profile Name] | Test3 |
[Paper Size] | 210.0 e 297.0 / A4 SEF |
[Cut Type] | Four Edge Trim / Crease |
[Finished Size(Height)] | 194.0 |
[Finished Size(Width)] | 271.0 |
[Leading Edge] | 13.0 |
[Trailing Edge] | 13.0 (automatic setting) |
[Rear Edge] | 8.0 |
[Front Edge] | 8.0 (automatic setting) |
[Downward Crease1] | 90.0 |
[Downward Crease2] | 180.0 |
[Downward Crease3] to [Downward Crease5] | Disabled |
[Upward Crease1] to [Upward Crease5] | Disabled |
If the item you want to set is not displayed, scroll down the screen with the slider. | |
 | |
Four Edge Trim (Perforation)
This section describes how to configure trimmer profiles for four edge trimming (perforation).
1
Click [Create].
2
Configure and set the [Profile Name] or [Cut Type] ([Four Edge Trim]), [Paper Size], [Unit], [Option] ([Perforation]).
Usable Paper Size: (Width) 140.0 mm to 330.2 mm, (Length) 153.0 mm to 487.7 mm / (Width) 5.51" to 13", (Length) 6.02" to 19.20"
3
Enter the [Finished Size(Height)] and [Finished Size(Width)].
4
Enter the [Leading Edge] (amount of the lead edge to be cut) and [Rear Edge] (amount of top edge to be cut).
Decide the setting values for [Leading Edge] (C1) and [Rear Edge] (S1) as the starting points for the base points, as shown in the figure. Set the cutting position so that the size of the paper being used is cut to the desired finish size.
Tips
- There are limits on the setting values for [Finished Size(Height)] (a) or [Finished Size(Width)] (b), [Leading Edge] (C1), [Rear Edge] (S1). For details about limitations, refer to the "Four Edge Trim / Perforation Limitations" (described after the procedure).
- Some items allow you to change the limits of the setting values. For changes, contact your service representative.
- An error message will be displayed when a value that does not fall within the applicable range is set, and hence the trimmer profile cannot be created. If an error message is displayed, check the input value or change the paper size being used. For details about the available paper size, refer to "Allowable Paper Sizes" (described after the procedure).
- When you enter [Leading Edge] (C1) and [Rear Edge] (S1), [Trailing Edge] (C2) and [Front Edge] (S2) are set automatically. Exceeding the [Trailing Edge] and [Front Edge] limitations will also result in an error. Be sure to take note of the limitations for each of the various setting values.
5
Set [FD Perforation (Rear Edge)] and [FD Perforation (Front Edge)], [Size] as necessary.
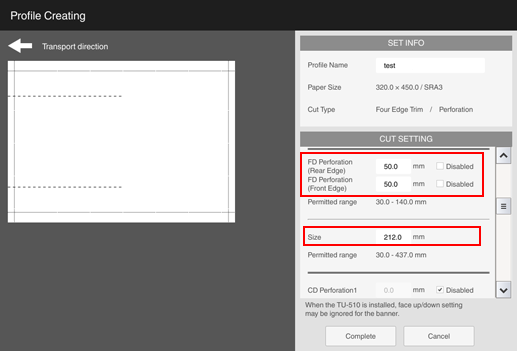
The perforation positions are set at 30.0 mm / 1.18" or more from the trim area, and the perforation position intervals at 100.0 mm / 3.94" or more.
Set [Size] at 30.0 mm / 1.18"or more.
6
Enter [CD Perforation1] to [CD Perforation5], or [Size (Rear Edge)] and [Size (Front Edge)], as necessary.
Up to 5 perforations can be set, depending on the finish size and setting position.
The perforation positions are set at 30.0 mm / 1.18" or more from the trim area, and the perforation intervals at 30.0 mm / 1.18" or more.
Set [Size (Rear Edge)] and [Size (Front Edge)] at 30.0 mm / 1.18"or more.
7
This section shows example settings for [Four Edge Trim / Perforation].

For details about setting examples, refer to "Settings Example 1" to "Settings Example 3" (described after the procedure).
8
Click [Complete].
The created trimmer profile is saved.
Allowable Paper Sizes | ||
|---|---|---|
x | Paper size (horizontal width) | 153.0 mm to 487.7 mm / 6.02" to 19.20" |
y | Paper size (vertical width) | 140.0 mm to 330.2 mm / 5.51" to 13" |
Four Edge Trim / Perforation Limitations | ||
|---|---|---|
a | [Finished Size(Height)] | 120.0 mm / 4.72" or more |
b | [Finished Size(Width)] | 133.0 mm / 5.24" or more |
C1 | [Leading Edge] (amount of lead edge to be cut) | 0 mm / 0" (None) or 10.0 mm to 100.0 mm / 0.39" to 3.94" |
C2 | [Trailing Edge] (amount of rear edge to be cut) | 0 mm / 0" (None) or 10.0 mm to 13.0 mm / 0.39" to 0.51" |
S1 | [Rear Edge] (amount of top edge to be cut) | 0 mm / 0" (none) or 8.0 mm to 30.0 mm / 0.32" to 1.18" Set the difference between [Rear Edge] (amount of top edge to be cut) and [Front Edge] (amount of bottom edge to be cut) within 10.0 mm / 0.39". Cutting only [Rear Edge] (amount of top edge to be cut) or only [Front Edge] (amount of bottom edge to be cut) is not possible. |
S2 | [Front Edge] (amount of bottom edge to be cut) | |
Settings Example 1 (Paper Size: SRA3, Units: mm) | |
|---|---|
[Profile Name] | Test1 |
[Paper Size] | 320.0 e 450.0 / SRA3 |
[Cut Type] | Four Edge Trim / Perforation |
[Finished Size(Height)] | 280.0 |
[Finished Size(Width)] | 424.0 |
[Leading Edge] | 13.0 |
[Trailing Edge] | 13.0 (automatic setting) |
[Rear Edge] | 20.0 |
[Front Edge] | 20.0 (automatic setting) |
[FD Perforation (Rear Edge)] | Disabled |
[FD Perforation (Front Edge)] | Disabled |
[CD Perforation1] to [CD Perforation5] | Disabled |
If the item you want to set is not displayed, scroll down the screen with the slider. | |
 | |
Settings Example 2 (Paper Size: SRA3, Units: mm) | |
|---|---|
[Profile Name] | Test2 |
[Paper Size] | 320.0 e 450.0 / SRA3 |
[Cut Type] | Four Edge Trim / Perforation |
[Finished Size(Height)] | 280.0 |
[Finished Size(Width)] | 424.0 |
[Leading Edge] | 13.0 |
[Trailing Edge] | 13.0 (automatic setting) |
[Rear Edge] | 20.0 |
[Front Edge] | 20.0 (automatic setting) |
[FD Perforation (Rear Edge)] | 50.0 |
[FD Perforation (Front Edge)] | 50.0 |
[Size] | 212.0 |
[CD Perforation1] | 106.0 |
[Size (Rear Edge)] | 50.0 |
[Size (Front Edge)] | 50.0 |
[CD Perforation2] | 212.0 |
[Size (Rear Edge)] | 280.0 |
[Size (Front Edge)] | 0.0 |
[CD Perforation3] to [CD Perforation5] | Disabled |
If the item you want to set is not displayed, scroll down the screen with the slider. | |
 | |
Settings Example 3 (Paper Size: A4 SEF, Units: mm) | |
|---|---|
[Profile Name] | Test3 |
[Paper Size] | 210.0 e 297.0 / A4 SEF |
[Cut Type] | Four Edge Trim / Perforation |
[Finished Size(Height)] | 194.0 |
[Finished Size(Width)] | 270.0 |
[Leading Edge] | 14.0 |
[Trailing Edge] | 13.0 (automatic setting) |
[Rear Edge] | 8.0 |
[Front Edge] | 8.0 (automatic setting) |
[FD Perforation (Rear Edge)] | 30.0 |
[FD Perforation (Front Edge)] | 30.0 |
[Size] | 283.0 |
[CD Perforation1] | 60.0 |
[Size (Rear Edge)] | 30.0 |
[Size (Front Edge)] | 30.0 |
[CD Perforation2] | 120.0 |
[Size (Rear Edge)] | 30.0 |
[Size (Front Edge)] | 30.0 |
[CD Perforation3] | 180.0 |
[Size (Rear Edge)] | 30.0 |
[Size (Front Edge)] | 30.0 |
[CD Perforation4] to [CD Perforation5] | Disabled |
If the item you want to set is not displayed, scroll down the screen with the slider. | |
 | |
Multiple Cutting
This section describes how to configure trimmer profiles for multiple cutting.
1
Click [Create].
2
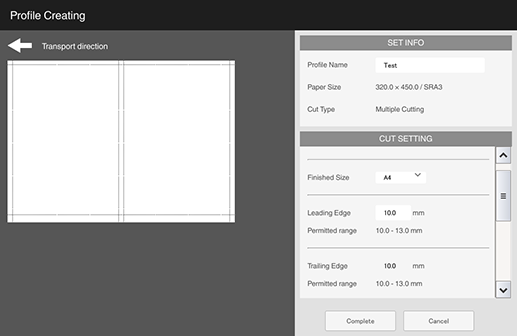
Configure and set the [Profile Name] or [Cut Type] ([Multiple Cutting]), [Paper Size], [Unit].

Available paper sizes: Widthwise 140.0 mm to 330.2 mm, Lengthwise 266.0 mm to 487.7 mm/Widthwise 5.51" to 13", Lengthwise 10.47" to 19.20" (Widthwise 313.0 mm to 330.2 mm, Lengthwise 440.0 mm to 459.0 mm/Widthwise 12.32" to 13", Lengthwise 17.32" to 18.07" (When creating A4), Widthwise 295.4 mm to 330.2 mm, Lengthwise 451.8 mm to 470.8 mm/Widthwise 11.63" to 13", Lengthwise 17.79" to 18.54" (When creating Letter))
3
Select [Finished Size] (A4 or LTR).
4
Enter the [Leading Edge] (amount of the lead edge to be cut), [Rear Edge] (amount of top edge to be cut), and [Cut Width(lengthwise)].

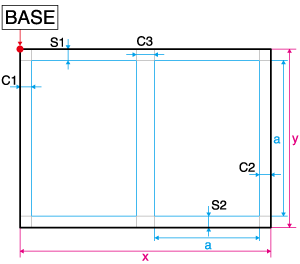
Decide the setting values for [Leading Edge] (C1), [Rear Edge] (S1), and [Cut Width(lengthwise)] (C3) as the starting points for the base points, as shown in the figure. Set the cutting position so that the size of the paper being used is cut to the desired finish size.
Tips
- There are limits on the setting values for [Leading Edge] (C1) or [Rear Edge] (S1), [Cut Width(lengthwise)] (C3). For details about limitations, refer to the "Multiple Cutting Limitations" (described after the procedure).
- Some items allow you to change the limits of the setting values. For changes, contact your service representative.
- An error message will be displayed when a value that does not fall within the applicable range is set, and hence the trimmer profile cannot be created. If an error message is displayed, check the input value or change the paper size being used. For details about the available paper size, refer to "Allowable Paper Sizes" (described after the procedure).
- When you enter [Leading Edge] (C1) and [Rear Edge] (S1), [Trailing Edge] (C2) and [Front Edge] (S2) are set automatically. Exceeding the [Trailing Edge] and [Front Edge] limitations will also result in an error. Be sure to take note of the limitations for each of the various setting values.
5
This section shows example settings for [Multiple Cutting].
For details about setting examples, refer to "Settings Example 1" (described after the procedure).
6
Click [Complete].
The created trimmer profile is saved.
Allowable Paper Sizes | ||
|---|---|---|
x | Paper size (horizontal width) | 266.0 mm to 487.7 mm / 10.47" to 19.20" (440.0 mm to 459.0 mm / 17.32" to 18.07" (When creating A4), 451.8 mm to 470.8 mm / 17.79" to 18.54" (When creating Letter)) |
y | Paper size (vertical width) | 140.0 mm to 330.2 mm / 5.51" to 13" (313.0 mm to 330.2 mm / 12.32" to 13" (When creating A4), 295.4 mm to 330.2 mm / 11.63" to 13" (When creating Letter)) |
Multiple Cutting Limitations | ||
|---|---|---|
a | [Finished Size] | A4 (297.0 mm e 210.0 mm / 11.69" e 8.27") or Letter (279.4 mm e 215.9 mm / 11.00" e 8.50") |
C1 | [Leading Edge] (amount of lead edge to be cut) | 10.0 mm to 13.0 mm / 0.39" to 0.51" |
C2 | [Trailing Edge] (amount of rear edge to be cut) | 10.0 mm to 13.0 mm / 0.39" to 0.51" |
C3 | [Cut Width(lengthwise)] | 0 mm / 0" (None) or 5.0 mm to 13.0 mm / 0.20" to 0.51" |
S1 | [Rear Edge] (amount of top edge to be cut) | 8.0 mm to 30.0 mm / 0.32" to 1.18" Set the difference between [Rear Edge] (amount of top edge to be cut) and [Front Edge] (amount of bottom edge to be cut) within 10.0 mm / 0.39". Cutting only [Rear Edge] (amount of top edge to be cut) or only [Front Edge] (amount of bottom edge to be cut) is not possible. |
S2 | [Front Edge] (amount of bottom edge to be cut) | |
Settings Example 1 (Paper Size: SRA3, Units: mm) | |
|---|---|
[Profile Name] | Test |
[Paper Size] | 320.0 e 450.0 / SRA3 |
[Cut Type] | Multiple Cutting |
[Finished Size] | A4 |
[Leading Edge] | 10.0 |
[Trailing Edge] | 10.0 (automatic setting) |
[Rear Edge] | 8.0 |
[Front Edge] | 15.0 (automatic setting) |
[Cut Width(lengthwise)] | 10.0 |
 | |
Multiple Cutting (Half-cut)
This section describes how to configure trimmer profiles for multiple cutting (half-cut).
1
Click [Create].
2
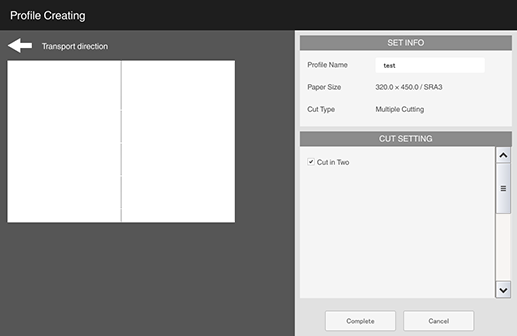
Configure and set the [Profile Name] or [Cut Type] ([Multiple Cutting]), [Paper Size], [Unit].
Available paper sizes: Widthwise 140.0 mm to 330.2 mm, Lengthwise 266.0 mm to 487.7 mm/Widthwise 5.51" to 13", Lengthwise 10.47" to 19.20" (Widthwise 313.0 mm to 330.2 mm, Lengthwise 440.0 mm to 459.0 mm/Widthwise 12.32" to 13", Lengthwise 17.32" to 18.07" (When creating A4), Widthwise 295.4 mm to 330.2 mm, Lengthwise 451.8 mm to 470.8 mm/Widthwise 11.63" to 13", Lengthwise 17.79" to 18.54" (When creating Letter))
3
Select the [Cut in Two] check box.
4
Click [Complete].
The created trimmer profile is saved.
Card Cutting
This section describes how to configure trimmer profiles for card cutting.
1
Click [Create].
2
Configure and set the [Profile Name] or [Cut Type] ([Card Cutting]), [Paper Size], [Unit].

Usable Paper Size: (Width) 287.0 mm to 330.2 mm, (Length) 370.0 mm to 457.2 mm / (Width) 11.30" to 13", (Length) 14.57" to 18"
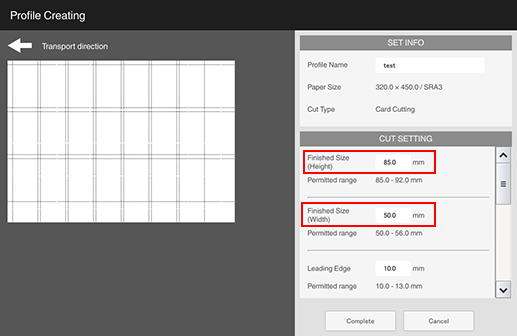
3
Enter the [Finished Size(Height)] and [Finished Size(Width)].
4
Enter the [Leading Edge] (amount of the lead edge to be cut), [Rear Edge] (amount of top edge to be cut), and [Cut Width(lengthwise)].

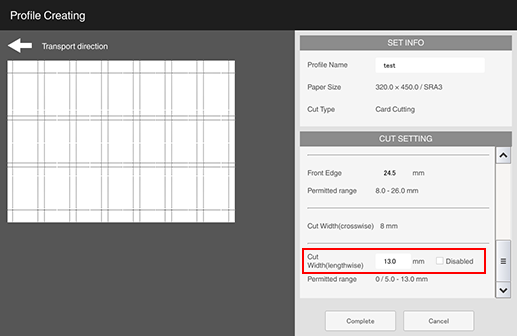
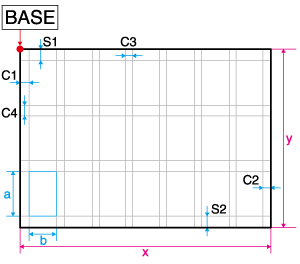
Decide the setting values for [Leading Edge] (C1), [Rear Edge] (S1), and [Cut Width(lengthwise)] (C3) as the starting points for the base points, as shown in the figure. Set the cutting position so that the size of the paper being used is cut to the desired finish size.
Tips
- There are limits on the setting values for [Finished Size(Height)] (a) or [Finished Size(Width)] (b), [Leading Edge] (C1), [Rear Edge] (S1), [Cut Width(lengthwise)] (C3). For details about limitations, refer to the "Card Cutting Limitations" (described after the procedure).
- Some items allow you to change the limits of the setting values. For changes, contact your service representative.
- An error message will be displayed when a value that does not fall within the applicable range is set, and hence the trimmer profile cannot be created. If an error message is displayed, check the setting values or change the paper size being used. For details about the available paper size, refer to "Allowable Paper Sizes" (described after the procedure).
- When you enter [Leading Edge] (C1) and [Rear Edge] (S1), [Trailing Edge] (C2) and [Front Edge] (S2) are set automatically. Exceeding the [Trailing Edge] and [Front Edge] limitations will also result in an error. Be sure to take note of the limitations for each of the various setting values.
- [Cut Width(crosswise)] (C4) is fixed at 8 mm.
- If the paper size is SRA3 or 12 e 18, the maximum number of cards that can be created is 3 e 7 rows = 21 cards.
5
This section shows example settings for [Card Cutting].
For details about setting examples, refer to "Settings Example 1" to "Settings Example 2" (described after the procedure).
6
Click [Complete].
The created trimmer profile is saved.
Allowable Paper Sizes | ||
|---|---|---|
x | Paper size (horizontal width) | 370.0 mm to 457.2 mm / 14.57" to 18" |
y | Paper size (vertical width) | 287.0 mm to 330.2 mm / 11.30" to 13" |
Card Cutting Limitations | ||
|---|---|---|
a | [Finished Size(Height)] | 85.0 mm to 92.0 mm / 3.35" to 3.62" |
b | [Finished Size(Width)] | 50.0 mm to 56.0 mm / 1.97" to 2.21" |
C1 | [Leading Edge] (amount of lead edge to be cut) | 10.0 mm to 13.0 mm / 0.39" to 0.51" |
C2 | [Trailing Edge] (amount of rear edge to be cut) | 10.0 mm to 13.0 mm / 0.39" to 0.51" |
C3 | [Cut Width(lengthwise)] | 0 mm / 0" (None) or 5.0 mm to 13.0 mm / 0.20" to 0.51" |
C4 | [Cut Width(crosswise)] | 8.0 mm / 0.32" (Fixed) |
S1 | [Rear Edge] (amount of top edge to be cut) | 0 mm / 0" (None) or 8.0 mm to 30.0 mm / 0.32" to 1.18" Set the difference between [Rear Edge] (amount of top edge to be cut) and [Front Edge] (amount of bottom edge to be cut) within 10.0 mm / 0.39". Cutting only [Rear Edge] (amount of top edge to be cut) or only [Front Edge] (amount of bottom edge to be cut) is not possible. |
S2 | [Front Edge] (amount of bottom edge to be cut) | |
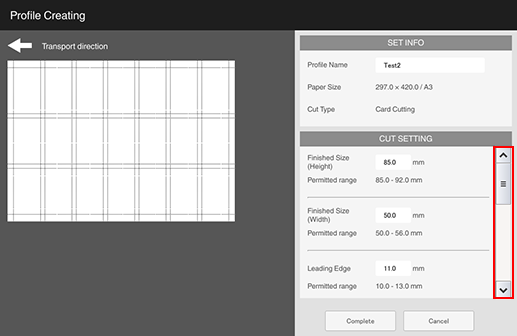
Settings Example 1 (Paper Size: SRA3, Units: mm) | |
|---|---|
[Profile Name] | Test1 |
[Paper Size] | 320.0 e 450.0 / SRA3 |
[Cut Type] | Card Cutting |
[Finished Size(Height)] | 85.0 |
[Finished Size(Width)] | 50.0 |
[Leading Edge] | 11.0 |
[Trailing Edge] | 11.0 (automatic setting) |
[Rear Edge] | 24.5 |
[Front Edge] | 24.5 (automatic setting) |
[Cut Width(crosswise)] | 8 (Fixed) |
[Cut Width(lengthwise)] | 13.0 |
If the item you want to set is not displayed, scroll down the screen with the slider. | |
 | |
Settings Example 2 (Paper Size: A3, Units: mm) | |
|---|---|
[Profile Name] | Test2 |
[Paper Size] | 297.0 e 420.0 / A3 |
[Cut Type] | Card Cutting |
[Finished Size(Height)] | 85.0 |
[Finished Size(Width)] | 50.0 |
[Leading Edge] | 11.0 |
[Trailing Edge] | 11.0 (automatic setting) |
[Rear Edge] | 13.0 |
[Front Edge] | 13.0 (automatic setting) |
[Cut Width(crosswise)] | 8 (Fixed) |
[Cut Width(lengthwise)] | 8.0 |
If the item you want to set is not displayed, scroll down the screen with the slider. | |
 | |
[1x1-3x3 Cutting(CR)]
This section describes how to configure custom (crease) trimmer profiles.
1
Select [Create].
2
Configure and set the [Profile Name] or [Cut Type] ([1x1-3x3 Cutting(CR)]), [Paper Size], [Unit].
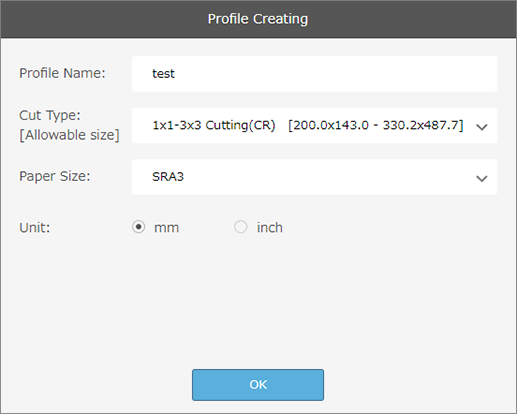
Usable Paper Size: (Width) 200.0 mm to 330.2 mm, (Length) 143.0 mm to 487.7 mm / (Width) 7.87" to 13", (Length) 5.63" to 19.20"
3
Enter the [Finished Size(Height)] and [Finished Size(Width)].

4
Enter the [Leading Edge] (amount of the lead edge to be cut), [Rear Edge] (amount of top edge to be cut), and [Cut Width(lengthwise)].
Decide the setting values for [Leading Edge] (C1), [Rear Edge] (S1), and [Cut Width(lengthwise)] (C3) as the starting points for the base points, as shown in the figure. Set the cutting position so that the size of the paper being used is cut to the desired finish size.
Tips
- There are limits on the setting values for [Finished Size(Height)] (a) or [Finished Size(Width)] (b), [Leading Edge] (C1), [Rear Edge] (S1), [Cut Width(lengthwise)] (C3). For details about limitations, refer to the "1x1-3x3 Trimming (CR) Limitations" (described after the procedure).
- Some items allow you to change the limits of the setting values. For changes, contact your service representative.
- An error message will be displayed when a value that does not fall within the applicable range is set, and hence the trimmer profile cannot be created. If an error message is displayed, check the setting values or change the paper size being used. For details about the available paper size, refer to "Allowable Paper Sizes" (described after the procedure).
- When you enter [Leading Edge] (C1) and [Rear Edge] (S1), [Trailing Edge] (C2) and [Front Edge] (S2) are set automatically. Exceeding the [Trailing Edge] and [Front Edge] limitations will also result in an error. Be sure to take note of the limitations for each of the various setting values.
- [Cut Width(crosswise)] (C4) is fixed at 8 mm.
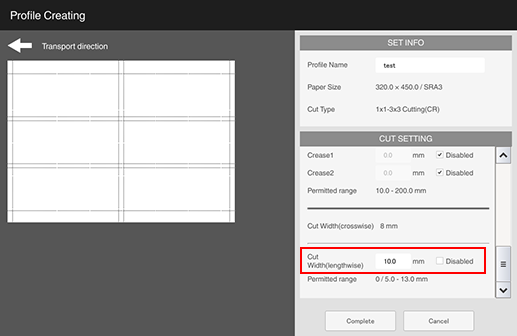
5
Enter [Crease1] to [Crease5] as necessary.
Up to 5 creases can be set, depending on the finish size (number).
To cut in the transverse direction and have 2 impositions, you can set the position of [Crease1] and [Crease2], for a maximum of 2 crease positions.
To cut in the transverse direction and have 3 impositions, the only crease position that can be set is [Crease1].
The crease positions are set at 10.0 mm / 0.394" or more from the trim area, and the crease intervals at 1.0 mm / 0.039" or more.
6
This section shows example settings for [1x1-3x3 Cutting(CR)].
For details about setting examples, refer to "Settings Example 1" to "Settings Example 2" (described after the procedure).
7
Click [Complete].
The created trimmer profile is saved.
Allowable Paper Sizes | ||
|---|---|---|
x | Paper size (horizontal width) | 143.0 mm to 487.7 mm / 5.6" to 19.20" |
y | Paper size (vertical width) | 140.0 mm to 330.2 mm / 5.51" to 13" |
1x1-3x3 Trimming (CR) Limitations | ||
|---|---|---|
a | [Finished Size(Height)] | 85.0 mm / 3.35" or higher |
b | [Finished Size(Width)] | 133.0 mm / 5.24" or more |
C1 | [Leading Edge] (amount of lead edge to be cut) | 0 mm / 0" (None) or 10.0 mm to 13.0 mm / 0.39" to 0.51" |
C2 | [Trailing Edge] (amount of rear edge to be cut) | 0 mm / 0" (None) or 10.0 mm to 13.0 mm / 0.39" to 0.51" |
C3 | [Cut Width(lengthwise)] | 0 mm / 0" or 5.0 mm to 13.0 mm / 0.120" to 0.51" |
C4 | [Cut Width(crosswise)] | 8.0 mm / 0.32" (Fixed) |
S1 | [Rear Edge] (amount of top edge to be cut) | 0 mm / 0" (None) or 8.0 mm to 30.0 mm / 0.32" to 1.18" Set the difference between [Rear Edge] (amount of top edge to be cut) and [Front Edge] (amount of bottom edge to be cut) within 10.0 mm / 0.39". Cutting only [Rear Edge] (amount of top edge to be cut) or only [Front Edge] (amount of bottom edge to be cut) is not possible. |
S2 | [Front Edge] (amount of bottom edge to be cut) | |
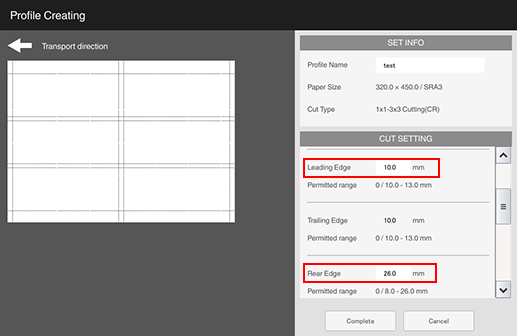
Settings Example 1 (Paper Size: SRA3, Units: mm) | |
|---|---|
[Profile Name] | Test1 |
[Paper Size] | 320.0 e 450.0 / SRA3 |
[Cut Type] | 1x1-3x3 Trimming (CR) |
[Finished Size(Height)] | 85.0 |
[Finished Size(Width)] | 210.0 |
[Leading Edge] | 10.0 |
[Trailing Edge] | 15.0 (automatic setting) |
[Rear Edge] | 26.0 |
[Front Edge] | 23.0 (automatic setting) |
[Crease1], [Crease2] | Disabled |
[Cut Width(crosswise)] | 8 (Fixed) |
[Cut Width(lengthwise)] | 10.0 |
If the item you want to set is not displayed, scroll down the screen with the slider. | |
 | |
Settings Example 2 (Paper Size: A3, Units: mm) | |
|---|---|
[Profile Name] | Test2 |
[Paper Size] | 297.0 e 420.0 / A3 |
[Cut Type] | 1x1-3x3 Trimming (CR) |
[Finished Size(Height)] | 85.0 |
[Finished Size(Width)] | 400.0 |
[Leading Edge] | 10.0 |
[Trailing Edge] | 10.0 (automatic setting) |
[Rear Edge] | 8.0 |
[Front Edge] | 18.0 (automatic setting) |
[Crease1] | 60.0 |
[Crease2] | 200.0 |
[Crease3] | 340.0 |
[Crease4], [Crease5] | Disabled |
[Cut Width(crosswise)] | 8 (Fixed) |
[Cut Width(lengthwise)] | Disabled |
If the item you want to set is not displayed, scroll down the screen with the slider. | |
 | |
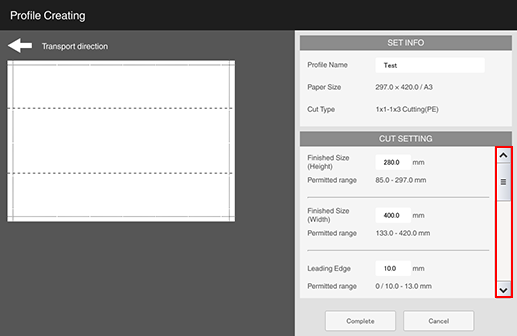
[1x1-1x3 Cutting(PE)]
This section describes how to configure custom (perforation) trimmer profiles.
1
Select [Create].
2
Configure and set the [Profile Name] or [Cut Type] ([1x1-1x3 Cutting(PE)]), [Paper Size], [Unit].
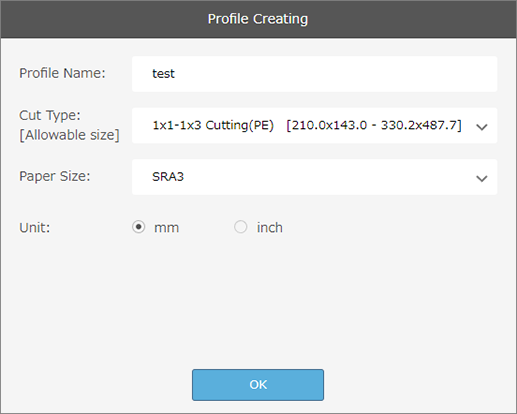
Available Paper Size: (Widthwise) 210.0 mm to 330.2 mm, (Lengthwise) 143.0 mm to 487.7 mm/(Widthwise) 8.27" to 13", (Lengthwise) 5.63" to 19.20"
3
Enter the [Finished Size(Height)] and [Finished Size(Width)].

4
Enter the [Leading Edge] (amount of the lead edge to be cut), [Rear Edge] (amount of top edge to be cut), and [Cut Width(lengthwise)].

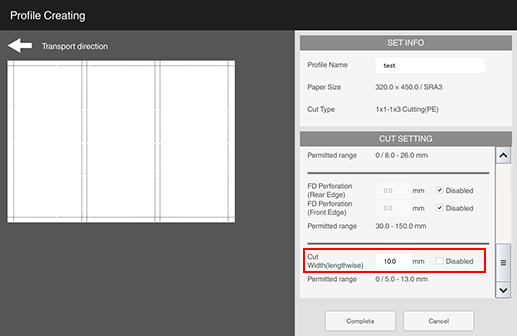
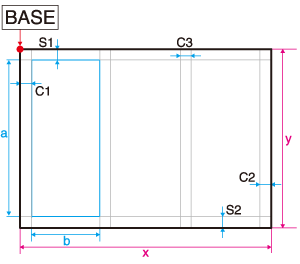
Decide the setting values for [Leading Edge] (C1), [Rear Edge] (S1), and [Cut Width(lengthwise)] (C3) as the starting points for the base points, as shown in the figure. Set the cutting position so that the size of the paper being used is cut to the desired finish size.
Tips
- There are limits on the setting values for [Finished Size(Height)] (a) or [Finished Size(Width)] (b), [Leading Edge] (C1), [Rear Edge] (S1), [Cut Width(lengthwise)] (C3). For details about limitations, refer to the "1x1-1x3 Trimming (PE) Limitations" (described after the procedure).
- Some items allow you to change the limits of the setting values. For changes, contact your service representative.
- An error message will be displayed when a value that does not fall within the applicable range is set, and hence the trimmer profile cannot be created. If an error message is displayed, check the setting values or change the paper size being used. For details about the available paper size, refer to "Allowable Paper Sizes" (described after the procedure).
- When you enter [Leading Edge] (C1) and [Rear Edge] (S1), [Trailing Edge] (C2) and [Front Edge] (S2) are set automatically. Exceeding the [Trailing Edge] and [Front Edge] limitations will also result in an error. Be sure to take note of the limitations for each of the various setting values.
5
Enter [FD Perforation (Rear Edge)] and [FD Perforation (Front Edge)] as necessary.
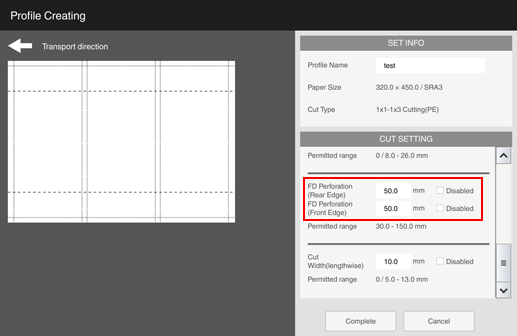
The perforation positions are set at 30.0 mm / 1.18" or more from the trim area. If the perforation positions is 2, set the distance between the rear and front perforation positions at 100 mm / 3.94" or more.
The length of the transverse perforation is set to the paper size width (it cannot be set up halfway through the paper).
6
This section shows example settings for [1x1-1x3 Cutting(PE)].
For details about setting examples, refer to "Settings Example 1" to "Settings Example 2" (described after the procedure).
7
Click [Complete].
The created trimmer profile is saved.
Allowable Paper Sizes | ||
|---|---|---|
x | Paper size (horizontal width) | 143.0 mm to 487.7 mm / 5.63" to 19.20" |
y | Paper size (vertical width) | 140.0 mm to 330.2 mm / 5.51" to 13" |
1x1-1x3 Trimming (PE) Limitations | ||
|---|---|---|
a | [Finished Size(Height)] | 85.0 mm / 3.35" or higher |
b | [Finished Size(Width)] | 133.0 mm / 5.24" or more |
C1 | [Leading Edge] (amount of lead edge to be cut) | 0 mm / 0" (None) or 10.0 mm to 13.0 mm / 0.39" to 0.51" |
C2 | [Trailing Edge] (amount of rear edge to be cut) | 0 mm / 0" (None) or 10.0 mm to 13.0 mm / 0.39" to 0.51" |
C3 | [Cut Width(lengthwise)] | 0 mm / 0" (None) or 5.0 mm to 18.0 mm / 0.20" to 0.51" |
S1 | [Rear Edge] (amount of top edge to be cut) | 0 mm / 0" (None) or 8.0 mm to 30.0 mm / 0.32" to 1.02" Set the difference between [Rear Edge] (amount of top edge to be cut) and [Front Edge] (amount of bottom edge to be cut) within 10.0 mm / 0.39". Cutting only [Rear Edge] (amount of top edge to be cut) or only [Front Edge] (amount of bottom edge to be cut) is not possible. |
S2 | [Front Edge] (amount of bottom edge to be cut) | |
Settings Example 1 (Paper Size: SRA3, Units: mm) | |
|---|---|
[Profile Name] | Test1 |
[Paper Size] | 320.0 e 450.0 / SRA3 |
[Cut Type] | 1x1-1x3 Trimming (PE) |
[Finished Size(Height)] | 300.0 |
[Finished Size(Width)] | 135.0 |
[Leading Edge] | 12.0 |
[Trailing Edge] | 13.0 (automatic setting) |
[Rear Edge] | 10.0 |
[Front Edge] | 10.0 (automatic setting) |
[FD Perforation (Rear Edge)] | Disabled |
[FD Perforation (Front Edge)] | Disabled |
[Cut Width(lengthwise)] | 10.0 |
If the item you want to set is not displayed, scroll down the screen with the slider. | |
 | |
Settings Example 2 (Paper Size: A3, Units: mm) | |
|---|---|
[Profile Name] | Test2 |
[Paper Size] | 297.0 e 420.0 / A3 |
[Cut Type] | 1x1-1x3 Trimming (PE) |
[Finished Size(Height)] | 280.0 |
[Finished Size(Width)] | 400.0 |
[Leading Edge] | 10.0 |
[Trailing Edge] | 10.0 (automatic setting) |
[Rear Edge] | 8.0 |
[Front Edge] | 9.0 (automatic setting) |
[FD Perforation (Rear Edge)] | 80.0 |
[FD Perforation (Front Edge)] | 80.0 |
[Cut Width(lengthwise)] | Disabled |
If the item you want to set is not displayed, scroll down the screen with the slider. | |
 | |
Accessing Trimming Settings
The 5 functions described in Step 2 on Trim Printing Workflow can be accessed in the ways shown below.
Tips
After selecting a trimmer profile, be sure to also configure the Output Tray settings. Printing will not start until the output destination has been correctly set. The trays that can be output in the respective trimming modes are as follows.
- [Four Edge Trim] : Secondary (sub) tray of Trimmer Unit TU-510, subsequent finisher (Finishing paper length is 133.0 mm / 5.24" or more, 488.0 mm/19.21" or lower. When [Perforation] is set, the subsequent finisher cannot be used.)
- [Multiple Cutting]: Trimmer Unit TU-510Secondary (sub) tray
- [Card Cutting]: Trimmer Unit TU-510Card tray
- [1x1-3x3 Cutting(CR)]: Trimmer Unit TU-510Secondary (sub) tray
- [1x1-1x3 Cutting(PE)]: Trimmer Unit TU-510Secondary (sub) tray
[MACHINE] - [JOB LIST] - [Job Ticket Edit] - [Trim]
[MACHINE] - [JOB LIST] - [Job Ticket Edit] - [Output Tray]
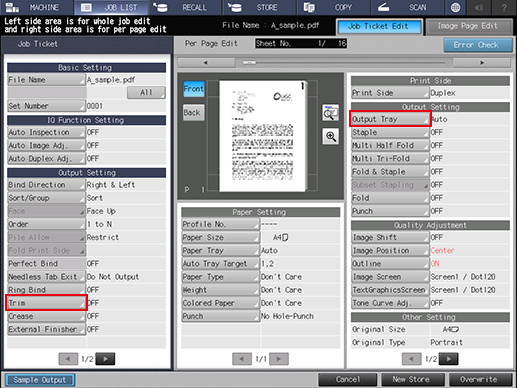
[MACHINE] - [COPY] - [Output Setting] - [Trim]
PS Plug-in Driver - [Finishing]
AccurioPro Print Manager - [Finishing]
Trim Printing Procedure
This section describes the procedure for trim process printing using the PS Plug-in Driver.
1
Open the file in the application, and click [Print] in the [File] menu.
2
Select the printer to use for printing, and click [Properties].
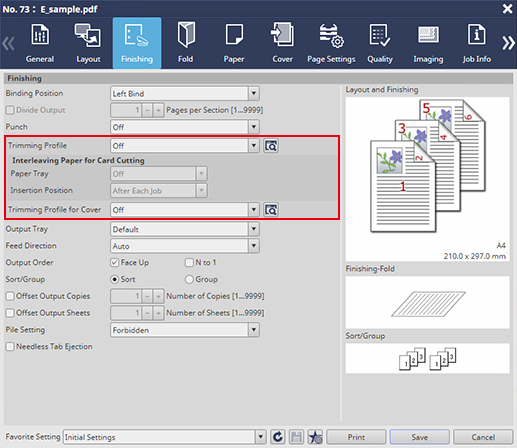
3
Click the [Finishing] tab, and select the trimmer profile you want to use during printing from the [Trimming Profile] menu list.
When using the trimmer profile in card cutting mode, select the paper feed tray to be used and the position for inserting the partition paper in [Interleaving Paper for Card Cutting].
After selecting a trimmer profile, also configure the [Output Tray] settings.
Click "
 " to update the trimmer profile menu list with the latest information.
4
To trim covers, select the appropriate trimmer profile from the [Trimming Profile for Cover] menu list.
Click "
" to update the trimmer profile menu list with the latest information.
5
Enter the [Copies] you want to print on the [Print] screen, and click [Print].
 in the upper-right of a page, it turns into
  and is registered as a bookmark.