
What Is [Secure Job]?
Overview
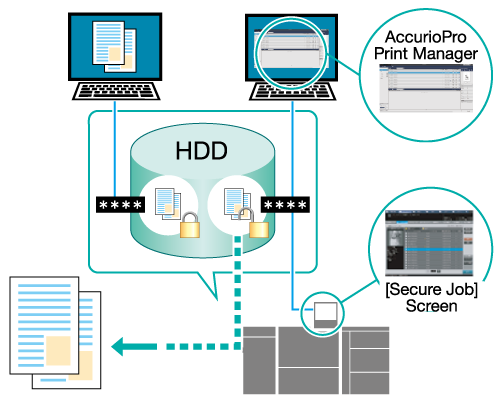
[Secure Job] a function that temporarily saves the print job sent from the printer driver in the box on the HDD. This function is suitable for printing highly confidential documents.
A password is always set for the box used for [Secure Job], so you need to enter the password on the Touch panel of this system for operation. After printing, [Secure Job] is automatically deleted, so third parties cannot perform operations such as job editing and printing.
Even if you send a job from a computer away from this system, you can manage prints without leaving them on this system, and you can prevent information from leaking due to misplacement or browsing by anyone other than yourself. Also, when printing from the Touch panel, you can manage prints that come out of this system, so it is convenient.

1st layer screen (Secure box list)
A list of boxes in the HDD in which [Secure Job] is stored is displayed. You can create new boxes or delete boxes.

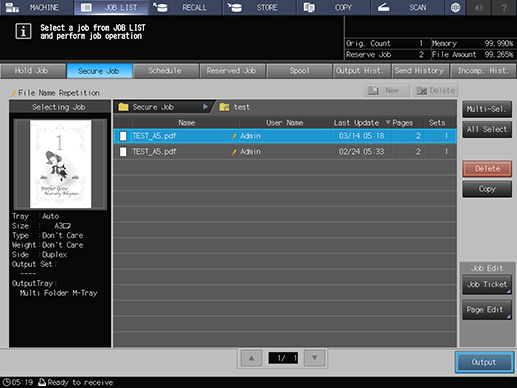
2nd layer screen (Secure job list)
When you select the box and enter the specified password, a list of [Secure Job]s in the box is displayed.
You can edit or print [Secure Job].

Tips
- The printer driver installed on the computer saves the print job sent from the computer as [Secure Job] on the system. For details, refer to Setting Procedure (Storing as a Secure Job).
- After printing, [Secure Job] is deleted automatically.
- The storage box of [Secure Job] can also be created with AccurioPro Print Manager. For details, refer to [Secure] Job List.
- You can configure the setting so that [User Name] is not displayed. For details, refer to [Personal Info. Protection].
Setting Items
Screen access
Touch panel - [JOB LIST] - [Secure Job]
Setting item | Description |
|---|---|
[New] | 1st layer: Create a new box to store [Secure Job]. Specify [Box Name] and [Password]. [Box Name]: Up to 8 single-byte alphanumeric characters [Password]: Up to 8 single-byte alphanumeric characters 2nd layer: - |
[Delete] | 1st layer: - 2nd layer: The selected [Secure Job] is deleted. |
Layer display area | Displays the layer of the [Secure Job] storage location. |
Icon/preview display field | 1st layer: The box is displayed by icon. 2nd layer: The page icon for blank paper is displayed. |
[Name] | 1st layer: The box name is displayed. 2nd layer: The file name of [Secure Job] is displayed. If the same file name is included in the box, the |
[User Name] | Displays the name of the user who created [Secure Job] when user authentication is enabled. Displays the account name of the user who created [Secure Job] when account track is enabled. |
[Last Update] | 1st layer: The date and time when the box was created is displayed. 2nd layer: The date and time when [Secure Job] was stored in the box is displayed. The date and time are updated for the copied job. |
[Pages] | 1st layer: - 2nd layer: The number of pages of [Secure Job] is displayed. |
[Sets] | 1st layer: - 2nd layer: The number of sets of [Secure Job] is displayed. |
[Multi-Sel.] | 1st layer: - 2nd layer: You can select multiple rows at the same time by first pressing this key and then selecting [Secure Job]. Pressing this key again releases the selection. |
[All Select] | 1st layer: - 2nd layer: All of [Secure Job] are selected. To release the selection, press [Multi-Sel.]. |
[Delete] | 1st layer: - 2nd layer: The selected [Secure Job] is deleted. |
[Copy] | 1st layer: - 2nd layer: The selected [Secure Job] is copied. |
[Job Ticket] | 1st layer: - 2nd layer: The [Job Ticket Edit] screen is displayed. For details, refer to What Is [Job Ticket Edit]?. |
[Page Edit] | 1st layer: - 2nd layer: The [Image Page Edit] screen is displayed. For details, refer to What Is [Image Page Edit]?. |
1st layer: - 2nd layer: The selected [Secure Job] is printed. After printing, the job is deleted automatically. | |
[Selecting Job] | 1st layer: - 2nd layer: The preview image and the output conditions of the selected [Secure Job] are displayed. If multiple [Secure Job] are selected, their file names are listed under the preview. When 8 or more [Secure Job] are selected, press [+]/[,] to change the display. |
Duplicate display | 1st layer: - 2nd layer: If a job with the same file name is included in the box, it is displayed as [File Name Repetition]. |
 mark is displayed on the right side.
 in the upper-right of a page, it turns into
  and is registered as a bookmark.