
[Expert Adj.]
Overview
Set the advanced adjustment items such as the transfer, separation, or fusing process.
Adjusting the [Expert Adj.] items allows you to deal with various situations or finishing conditions.

Tips
- The selectable items vary depending on the optional devices mounted on this system.
Setting Items

Setting item | Description |
|---|---|
[Offset Lead Edge1(Front)]*1 | Set the adjustment range when one of the following phenomena occurs on the front side of the paper. Paper jam (Jam code: J-2101): Enter a positive value. Paper jam (Jam code: J-3102): Enter a negative value. |
If [Offset Lead Edge1(Front)] is set, also set the same value to [Offset Lead Edge2(Front)]. The adjustment method (positive/negative) may vary depending on the condition of the paper. Adjustments may worsen a separation failure (drum and belt sections). Also, one of the following phenomena may occur.
Range: -128 to +127 | |
[Offset Lead Edge1(Back)] | Set the adjustment range when one of the following phenomena occurs on the back side of the paper. Paper jam (Jam code: J-2102): Enter a positive value. Paper jam (Jam code: J-3104): Enter a negative value. |
If [Offset Lead Edge1(Back)] is set, also set the same value to [Offset Lead Edge2(Back)]. The adjustment method (positive/negative) may vary depending on the condition of the paper. Adjustments may worsen a separation failure (drum and belt sections). Also, one of the following phenomena may occur.
Range: -128 to +127 | |
[Offset Lead Edge2(Front)]*1 | Set the adjustment range when one of the following phenomena occurs on the front side of the paper. Paper jam (Jam code: J-2101): Enter a positive value. Paper jam (Jam code: J-3102): Enter a negative value. |
If [Offset Lead Edge2(Front)] is set, also set the same value to [Offset Lead Edge1(Front)]. The adjustment method (positive/negative) may vary depending on the condition of the paper. Adjustments may worsen a separation failure (drum and belt sections). Also, one of the following phenomena may occur.
Range: -128 to +127 | |
[Offset Lead Edge2(Back)] | Set the adjustment range when one of the following phenomena occurs on the back side of the paper. Paper jam (Jam code: J-2102): Enter a positive value. Paper jam (Jam code: J-3104): Enter a negative value. |
If [Offset Lead Edge2(Back)] is set, also set the same value to [Offset Lead Edge1(Back)]. The adjustment method (positive/negative) may vary depending on the condition of the paper. Adjustments may worsen a separation failure (drum and belt sections). Also, one of the following phenomena may occur.
Range: -128 to +127 | |
[Offset Lead Edge3(Front)]*1 | Adjustment may be required for special paper and others, but basically no adjustment is required. Before setting, be sure to contact your service representative. Range: -128 to +127 |
[Offset Lead Edge3(Back)] | Adjustment may be required for special paper and others, but basically no adjustment is required. Before setting, be sure to contact your service representative. Range: -128 to +127 |
[Offset Image(Front)] | Set the adjustment range when one of the following phenomena occurs on the front side of the paper.
One of the following phenomena may occur as a result of adjustments.
Range: -128 to +127 |
[Offset Image(Back)] | Set the adjustment range when one of the following phenomena occurs on the back side of the paper.
One of the following phenomena may occur as a result of adjustments.
Range: -128 to +127 |
[Lead Edge Erase Quantity] | Set the adjustment range when one of the following phenomena occurs on the front side of the thin plain or fine paper (low stiffness paper).
One of the following phenomena may occur as a result of adjustments.
Range: 0 to +200 |
[Rear Edge Erase Quantity] | Set the adjustment range when one of the following phenomena occurs on the back side of the thin fine or plain paper (low stiffness paper).
One of the following phenomena may occur as a result of adjustments.
Range: 0 to +200 |
[Fusing Temperature Adjustment] | Set the adjustment range when one of the following phenomena occurs.
Range: -15 to +15 |
[IQ Transport Roller Speed Adj.] | If a crease or delivery failure occurs while thin paper (low stiffness paper) is scanned on Intelligent Quality Optimizer IQ-501, set the speed balance of the conveyance roller. Range: 0 to +20 |
[Pressure Power Setting] | If the fixability is insufficient, adjust to increase the pressure contact force. The amount of curl also increases. [Default]: Adjusts the pressure contact force using the Default setting. [Very Weak]: Adjusts the pressure contact force using the Very Weak setting. [Weak]: Adjusts the pressure contact force using the Weak setting. [Medium]: Adjusts the pressure contact force using the Medium setting. [Strong]: Adjusts the pressure contact force using the Strong setting. |
[Process Speed Setting] | Set the transport speed according to the paper type or weight. Normally set to [Default]. If a paper jam or double feed occurs, change the speed and make adjustments. This item is not able to be selected when the following settings are made.
|
[Process Speed Down Setting by Screen Pattern]*2 | Make settings to reduce the process speed of the screen. [ON]: Reduces the process speed of the screen. [OFF]: Does not drop the process speed of the screen. |
[Textured Density Level] | Set this item when there is transfer omission in the concave part of the textured paper.
The following setting is required to use this function.
[Level 1]: Suppresses the transfer omission of the concave part of the textured paper. [Level 2]: Suppresses a transfer omission in the concave part of the textured paper compared to [Level 1]. [Level 3]: Suppresses a transfer omission in the concave part of the textured paper compared to [Level 2]. |
[Mis-centering Detect JAM] | Configure the setting to detect mis-centering of 5 mm / 0.2" or more as a paper jam. [Detect]: Detects mis-centering. [Not Detect]: Does not detect mis-centering. |
[Double Feed Detection] | Configure the setting to detect double feeding. [Detect]: Detects double feeding. [Not Detect]: Does not detect double feeding. |
[Skew Detect Setting] | Configure the setting to detect paper skew during paper feeding as a paper jam.
[1.0%]: Detects as a paper jam when the paper is skewed by 1.0% or more. [0.5%]: Detects as a paper jam when the paper is skewed by 0.5% or more. [OFF]: Does not detect skew. |
[Fusing PPM Down] | Set this item when an image misalignment or creases occur depending on whether the paper is large or small. [ON(Manual)]: Manually set the print speed. For details about the setting, contact your service representative. [ON(Auto)]: Automatically reduces the print speed when the temperature of the fusing roller exceeds the specified value. [OFF]: Does not change the print speed. |
[Trans. Pressure Setting] | Set the pressure for printing.
|
[Transfer Belt Cleaning] | Set this item when stains occur on the back side depending on the usage environment of this system.
[Standard]: Performs the standard cleaning. [Setting1]: Performs [Setting1] cleaning. [Setting2]: Performs [Setting2] cleaning. |
[Trans.Belt Cleaning(RFP)] | Set this item when stains appear on the back side depending on the usage environment of this system.
[Standard]: Performs the standard cleaning. [Setting1]: Performs [Setting1] cleaning. [Setting2]: Performs [Setting2] cleaning. [Setting3]: Performs [Setting3] cleaning. |
[Fus.:Reduce Wrinkle Set.] | Set this item when creases occur on the rear edge of the paper just after warm-up processing.
[Reduce Level 1]: Reduces the number of creases that occur on the rear edge of the paper. [Reduce Level 2]: Reduces the number of creases that occur on the rear edge of the paper more effectively than [Reduce Level 1]. [Reduce Level 3]: Reduces the number of creases that occur on the rear edge of the paper more effectively than [Reduce Level 2]. |
[Lead Edge Transfer Set.] | Select whether to give priority to separation performance or the image at the lead edge to transfer the lead edge of the paper.
|
Separation level Select this item when prioritizing the separation performance. [Separation Lvl 0]: Prioritizes the separation performance. [Separation(+1)]: The amount of omission in the image at the lead edge increases by 2 mm compared to [Separation Lvl 0]. [Separation(+2)]: The amount of omission in the image at the lead edge increases by 2 mm compared to [Separation(+1)]. [Separation(+3)]: The amount of omission in the image at the lead edge increases by 2 mm compared to [Separation(+2)]. | |
Lead edge image level Select this item when prioritizing the printing of the image at the lead edge.
[Ld Edge ImgLvl 0]: Prioritizes printing of the image at the lead edge. [LdEdgeImgLvl +1]: The amount of image loss at the lead edge increases by 1 mm compared to [Ld Edge ImgLvl 0] (there is an exception). [LdEdgeImgLvl +2]: The amount of image loss at the lead edge increases by 1 mm compared to [LdEdgeImgLvl +1] (there is an exception). [LdEdgeImgLvl +3]: The amount of image loss at the lead edge increases by 1 mm compared to [LdEdgeImgLvl +2] (there is an exception). | |
[Lead Edge Transfer Set.When Full Bleed Printing] | Set whether to apply [Lead Edge Transfer Set.] for full bleed printing (borderless printing).
[Ld Ed Tra. Set.]: Applies the content set in [Lead Edge Transfer Set.]. [For Full Bleed]: Performs the operation suitable for full bleed printing. However, paper jams (J-2101, J-3102) are more likely to occur. |
[Centering Adj.(Front)] | Set this when you want to offset the image position on the front side. |
[ON(Blank)]: Select this item when the paper color is white. This function adjusts mis-centering on the front side of paper. [ON(PrePrinted)]: Select this option when performing PrePrinted. [OFF]: Does not make adjustment. | |
[Detect Setting]: Adjusts the mis-centering detection position when PrePrinted is selected. [(1)Detect Position]: Sets the distance from the lead edge of paper. Range: 5 mm to 25 mm [(2)Detect Range]: Sets the range without a rough sketch. Range: 1 mm to 10 mm | |
[PaperColor(Light)]: Select this item when the paper color is white or pale. [PaperColor(Dark)]: Select this item when the paper color is dark. | |
[Centering Adj.(Back)] | Set this when you want to offset the image position on the back side. |
[ON(Blank)]: Select this item when the paper color is white. This function adjusts mis-centering on the back side of paper. [ON(PrePrinted)]: Select this option when performing PrePrinted. [OFF]: Does not make adjustment. | |
[Detect Setting]: Adjusts the mis-centering detection position when PrePrinted is selected. [(1)Detect Position]: Sets the distance from the lead edge of paper. Range: 5 mm to 25 mm [(2)Detect Range]: Sets the range without a rough sketch. Range: 1 mm to 10 mm | |
[PaperColor(Light)]: Select this item when the paper color is white or pale. [PaperColor(Dark)]: Select this item when the paper color is dark. | |
[PFU Air Shutter Edge Position Setting] | Set the timing at which to stop air blowing at the PFU edge for floating the edges of the sheets fed from a tray or separating sheets. For thick or thin paper, make adjustment when one of the following phenomena occurs; it may be improved.
|
[Auto]: Automatically adjusts the timing at which to close the air shutter. [Manual]: Manually adjusts the timing at which to close the air shutter. [-1]: Manually advances the timing at which to close the air shutter. [+1]: Manually delays the timing at which to close the air shutter. [+2]: Adjusts the air shutter closing timing to be slower than [+1]. [OFF]: Disables the air shutter. | |
[PFU Paper Float Timing] | Set the timing at which to float paper by air blowing at the PFU lead edge. Some phenomena may be improved by adjustment.
|
[Auto]: Automatically adjusts the paper floating timing. [Manual]: Manually adjusts the paper floating timing. [Earlier]: Advances the paper floating timing. [Delay]: Select [Manual]. Delays the paper floating timing. | |
[PFU Pre-regist Roller Reverse Rotation Control] | If one of the following phenomena occurs; set to None; it may be improved. However, paper skewing may occur.
|
[Auto]: Automatically sets whether to control the reverse rotation of the pre-registered rollers. [Manual]: Manually sets whether to control the reverse rotation of the pre-registered rollers. [Reverse ON] or [Reverse OFF] is selectable. [Reverse ON]: Enables the reverse rotation control of the pre-registered rollers. [Reverse OFF]: Disables the reverse rotation control of the pre-registered rollers. | |
[Auto Inspection Level Detailed Setting]*3 | Adjust the inspection standard for automatic inspection (automatic inspection level). You can set the automatic inspection level for each paper tray. Even if [Enable] is selected, the operation is the same as [Disable] in the following cases.
When there are multiple paper trays to be used when executing a job
|
[Enable]: Sets the automatic inspection level for each paper tray. The paper loaded in the specified paper tray is automatically inspected at the selected level. [Disable]: Disables the automatic inspection level specified for each paper tray. The automatic inspection level specified in [Common Setting] or [IQ Function Setting] is enabled. [Detail Setting]: Inspection level selection key ([Essential], [Standard], [Premium], [Custom]) Sets the inspection level to suit the selected item. | |
[Excluding Edge Setting for Automatic Inspection]*3 | Set the default Inspection Excluding Area for automatic inspection. You can set the edge exclusion area for each paper tray when generating the reference image. Even if [Enable] is selected, the operation is the same as [Disable] in the following cases.
|
[Enable]: Sets the inspection exclusion area for each paper tray. The set value becomes the edge exclusion area when the reference image is generated. [Disable]: Disables the inspection exclusion area specified for each paper tray. The value specified in [Common Setting] or [Setting for Inspect. Of Excluded Areas] of [IQ Function Set.] is enabled. [Detail Setting]: Set the default Inspection Excluding Area for automatic inspection. | |
Keypad | Used to enter numeric values. Press [+ / -], and set the sign of the numeric value. |
*1: The following setting is required to use this function.
Select [Lead Edge Image] in [Expert Adj.] - [Lead Edge Transfer Set.].
*2: This setting is not available depending on the model you are using.
*3: All the following optional devices are required.
Intelligent Quality Optimizer IQ-501
Auto Inspection Unit UK-301
Relay Unit RU-702
Video Interface Kit VI-512
Video Interface Kit VI-513
Setting Procedure (Adjustment of [Auto Inspection Level Detailed Setting])
1
On the [Auto Inspection Level Detailed Setting] screen, press the key to select the inspection level to be adjusted.
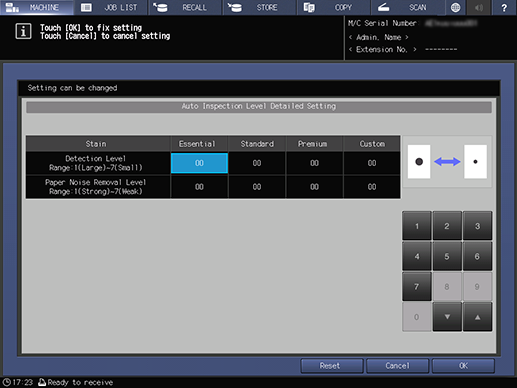
This section describes an example case in which the [Detection Level] of [Stain] is selected.
2
Use the on-screen keypad to enter the adjustment value.
3
Press [OK].
Setting Procedure (Adjustment of [Excluding Edge Setting for Automatic Inspection])
1
Press [Detail Setting] on the [Excluding Edge Setting for Automatic Inspection] screen.
The setting screen is displayed.
2
Press [Excluded Area of Lead Edge].
3
Use the on-screen keypad to enter the numeric value.
[Adj.Range:1~488mm] 1step=1 mm
4
Set [Excluded Area of Rear Edge] and [Excluded Area of Both Edges] in the same way.
5
Press [OK].
 in the upper-right of a page, it turns into
  and is registered as a bookmark.