
[CUT SETTING]
Overview
Arbitrarily set the finishing size for cutting, the cut positions at the lead edge and upper edge, and the cut width. The numeric values at the rear edge and lower edge are calculated automatically.
When attaching perforation, also set perforation positions.
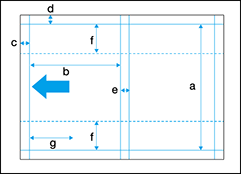
a: [Finished Size(Height)]
b: [Finished Size(Width)]
c: [Lead Edge]
d: [Upper Edge]
e: [Cut Width(lengthwise)]
f: Horizontal perforation position
Specifications
Category | Device Management, Print Workflow, Copy / Scan | ||
Location | Machine | Touch Panel | |
Printer driver | - | ||
Application | Web Connection, Web Utilities | ||
Required options | All the following optional devices are required. Trimmer Unit TU-510 Job Separator JS-507 | ||
Required items | - | ||
Setting items | [Finished Size(Height)] | Sets the height and width of the finishing size. Set the value to 85 mm / 3.346" or more. Unit: 0.1 mm / 0.004" | |
[Finished Size(Width)] | Sets the width of the finishing size. Set the value to 133 mm / 5.236" or more. Unit: 0.1 mm / 0.004" | ||
[Lead Edge] | Sets the cut position at the lead edge using the value from the lead edge of paper. Set the value in the range of 10 mm to 13 mm / 0.394" to 0.512", and also set the cutting amount at the rear edge in the range of 10 mm to 13 mm / 0.394" to 0.512". Unit: 0.1 mm / 0.004" | ||
[Rear Edge] | The rear edge position is automatically calculated from the paper size (widthwise), finishing size (width), lead edge position, and gutter slit width (vertical direction). Rear edge position = Paper size (widthwise) - Finishing size (width) - Lead edge position - Gutter slit width (vertical direction) | ||
[Upper Edge] | Sets the cut position at the upper edge using the value from the upper edge of paper. Set the value in the range of 8.0 mm to 26.0 mm / 0.315" to 1.024", and also set the difference between the upper and lower edge positions in the range of 10 mm / 0.394". Unit: 0.1 mm / 0.004" | ||
[Lower Edge] | The lower edge position is automatically calculated from the paper size (lengthwise), finishing size (height and width), and upper edge position. Lower edge position = Paper size (lengthwise) - Finishing size (height and width) - Upper side position | ||
Horizontal perforation position | You can set up to 2 horizontal perforation positions in the back and front sides. Leave a space of 30 mm / 1.181" or more from the rear or lead edge, and set so that the perforation position interval between the back and front sides is 120 mm / 4.724" or more. Unit: 0.1 mm / 0.004" | ||
[Cut Width(lengthwise)] | Sets the cut width of the vertical direction. Set the value in the range of 0 mm / 0" or 5 mm to 13 mm / 0.197" to 0.512". Unit: 0.1 mm / 0.004" | ||
[Disabled] | Clear this check box to set a perforation position or [Cut Width(lengthwise)]. | ||
[Complete] | Creates a trimmer profile with the specified value. | ||
[Cancel] | Cancels the setting, and returns to the previous screen. | ||
Remarks | The optional Perforation Unit PE-101 and Perforation Unit PE-102 are required to attach perforations. | ||
Reference | - | ||
Screen access | Touch panel - [MACHINE] - [Trimmer Profile] - [Create] - Select [Advanced Setting]. - Select [Perforation]. - [OK] | ||
Touch panel - [MACHINE] - [Trimmer Profile] - Select a trimmer profile of [Advanced Setting / Perforation]. - [Edit] | |||
Web Connection - Login screen - [Finisher Manager] - [TU-510 Profile Manager] - [Create] - Select [Advanced Setting]. - Select [Perforation]. - [OK] | |||
Web Connection - Login screen - [Finisher Manager] - [TU-510 Profile Manager] - Select a trimmer profile of [Advanced Setting / Perforation]. - [Edit] | |||
Web Utilities - [Finisher Manager] - [TU-510 Profile Manager] - [Create] - Select [Advanced Setting]. - Select [Perforation]. - [OK] | |||
Web Utilities - [Finisher Manager] - [TU-510 Profile Manager] - Select a trimmer profile of [Advanced Setting / Perforation]. - [Edit] | |||
 in the upper-right of a page, it turns into
  and is registered as a bookmark.