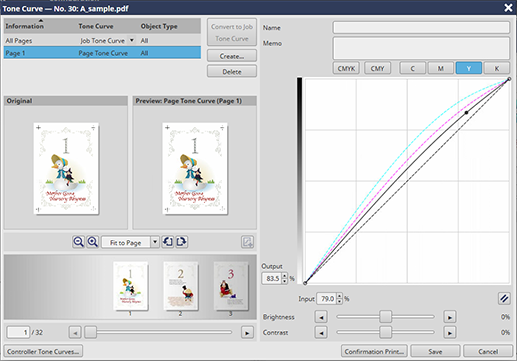
Tone Curve Adjustment Area
Overview
Operate the tone curve to adjust the input-output density curve for each of the CMYK colors.
This function also allows you to adjust the brightness and contrast of the entire image.
- The Image Controller is required to use this function. For details, refer to What Is AccurioPro Print Manager?.
Specifications
Category | Print Workflow | ||
Location | Machine | Touch Panel | |
Printer driver | - | ||
Application | AccurioPro Print Manager | ||
Required options | - | ||
Required items | - | ||
Setting items | [Name] | Enter the tone curve name. Up to 31 characters can be entered. | |
[Memo] | If necessary, enter a memo. Up to 64 characters can be entered. | ||
[CMYK] | Select the color to adjust a tone curve. [CMYK]: Tone curve adjustment with CMYK integrated [CMY]: Tone curve adjustment with CMY integrated | ||
[CMY] | |||
[C] | |||
[M] | |||
[Y] | |||
[K] | |||
[Output] | Enter the output density (%) for each color.
| ||
[Input] | Enter the input density (%) for each color. Range: 1.0% to 99.0% | ||
[Brightness] | Adjusts the brightness. Clicking " You can also drag the slider horizontally to adjust the brightness. | ||
[Contrast] | Adjusts the contrast. Clicking " You can also drag the slider horizontally to adjust the contrast. | ||
 | Resets the adjustment value. | ||
Remarks | - | ||
Reference | - | ||
Screen access | AccurioPro Print Manager - Select a job. - [Job Management] - [Tone Curve Adjustment...] | ||
AccurioPro Print Manager - Select a job, and right-click. - [Tone Curve Adjustment...] | |||
Touch panel - [CNTL] - Select a job. - [Job Management] - [Tone Curve Adjustment...] | |||
Touch panel - [CNTL] - Select a job, and right-click. - [Tone Curve Adjustment...] | |||
Procedure

The adjustment point (-) is created by pressing the desired point on the tone curve.
You can enter the numeric value in [Output] or [Input] to set the adjustment point.
Up to 17 adjustment points can be created on 1 tone curve (including 2 points of input: 0% and 100%).
The tone curve adjustment result can be confirmed on the preview.

The adjusted tone curve is saved.

 " darkens. Clicking "
 " lightens.
 in the upper-right of a page, it turns into
  and is registered as a bookmark.