
Loading Envelopes Into Paper Feeder Unit PF-710
Overview
Load envelopes into the Paper Feeder Unit PF-710.
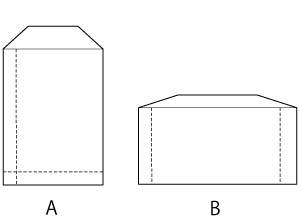
- A: Vertical B: Horizontal

- Available size
Widthwise 100 mm to 245 mm*, lengthwise 135 mm to 375 mm / Widthwise 3.94" to 9.65", lengthwise 5.31" to 14.76"
*: Available range of Side auxiliary guides: 100 mm to 139 mm / widthwise 3.94" to 5.47"
- Recommended sizes (not including flaps)
Standard | Size | Widthwise | Lengthwise |
|---|---|---|---|
Domestic standard | Square 2 | 240 mm / 9.45" | 332 mm / 13.07" |
Long 3 | 120 mm / 4.72" | 235 mm / 9.25" | |
Western 0 | 235 mm / 9.25" | 120 mm / 4.72" | |
North America standard | 6 e 9 1/2 | 241 mm / 9.49" | 152 mm / 5.98" |
5-3/4 e 8-7/8 | 226 mm / 8.90" | 146 mm / 5.75" | |
ISO standard | C5 | 229 mm / 9.02" | 162 mm / 6.38" |
C6/C5 | 229 mm / 9.02" | 114 mm / 4.49" |
- Load capacity
150 sheets
The height difference on the top of the envelope must be 10 mm / 0.39" or less.
- Unavailable envelopes
Envelope with film window
Envelope with double-sided tape and release paper on the flap

NOTICE
- It is recommended that you use one side seam (A) or double side seam (B) envelopes. If the sticking tab overlaps the print side, print output may be faded.
NOTICE
- If the machine is not powered on, the tray cannot be pulled out. Turn the Sub power switch on. For details, refer to Turning This System On.
- Do not pull out multiple trays at once. Doing so may cause the machine to topple over.
- Envelopes can only be loaded into the Middle tray (Tray 4) of the 1st paper feeder unit.
Procedure (For Envelope of the Width Less Than 100 mm to 139 mm / Widthwise 3.94" to 5.47")
1
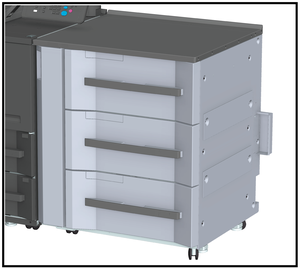
Pull out the tray to load envelopes into.
NOTICE
- Envelopes can only be loaded into the Middle tray of the 1st unit.
2
Open each of the Small size guides of the front and back side Side guides inward.
3
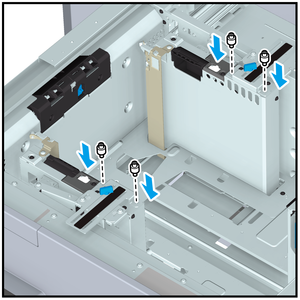
Remove the screws (2 nos. each at 2 locations) and mount the positioning screws (2 nos. each at 2 locations).
4
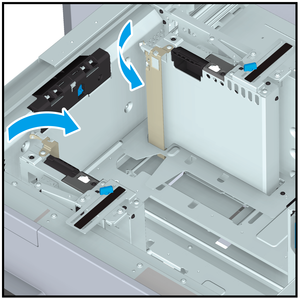
Insert and set the Side auxiliary guides (2 units) into the positioning screws of the Side guides.
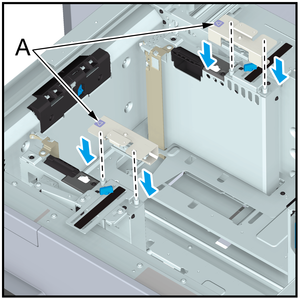
Attach the guides so that mark A is directed as shown in the figure.
5
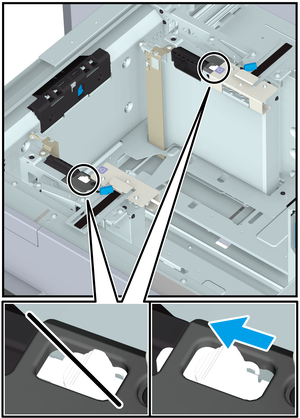
Slide the Paper holding plate fixing lever (2 locations) to the left, and lock them.
6
Loosen the Side guide lock knobs of Side guides on the tray.
7
Load envelopes into the tray with the print side facing up.
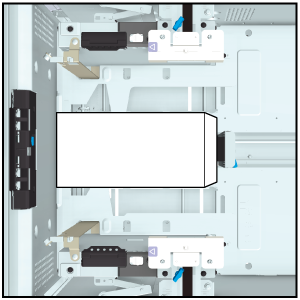
Load the envelopes against the top of the tray so that the open flaps are on the right side.
8
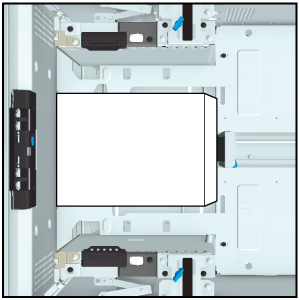
Place the Side guides of the tray along the envelopes, turn the Side guide lock knobs, and fix it.
9
Place the Rear guide plate of the tray against the envelopes.
10
Firmly push the tray all the way in.
Procedure (For Envelope of the Width Less Than 139.1 mm to 245 mm / 5.48" to 9.65")
1
Pull out the tray to load envelopes into.
NOTICE
- Envelopes can only be loaded into the Middle tray of the 1st unit.
2
Load envelopes into the tray with the print side facing up.
Load the envelopes against the top of the tray so that the open flaps are on the right side.
If the Side auxiliary guides is mounted, remove it. You do not need to remove the positioning screws.
3
Place the Side guides of the tray along the envelopes, turn the Side guide lock knobs, and fix it.
4
Place the Rear guide plate of the tray against the envelopes.
5
Firmly push the tray all the way in.
 in the upper-right of a page, it turns into
  and is registered as a bookmark.