
Printing Highly Confidential Documents ([Secure Print])
About Secure Print
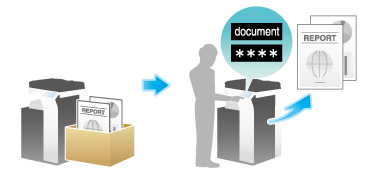
Secure Print is a function that assigns document ID and password to print data and saves the data to this machine. This function does not print data immediately, thereby preventing printed materials from being missing or left.
You need to enter the document ID and password on the screen of this machine to print the saved data. Therefore, this function is particularly suitable for safely printing highly confidential documents.

Setting Secure Print on your computer
Up to 40 documents or a total of 40 pages can be saved with Secure Print. You cannot save a document that exceeds 40 pages in a single job.
1
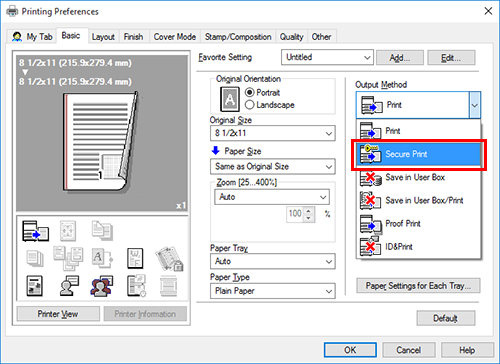
In [Output Method] in the [Basic] tab, select [Secure Print].
2
Enter the document ID and password, then click [OK].
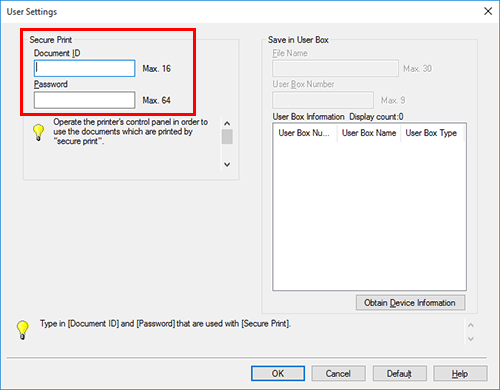
If you always use the same document ID and password, registering them in advance eliminates the need to enter them each time. For details, refer to Changing the default print settings.
3
Execute printing.
The data is saved on this machine. Then, proceed to "Printing on this machine".

Tips
- You can issue a print instruction from the screen of this machine before print data scanning on this machine is completed. However, printing is executed after print data scanning on this machine has been completed.
Printing on this machine (Basic style)
1
Tap [Secure Print] on the home screen.
The [Secure Print] position varies depending on the customization status of the home screen. By default, access from [Useful Apps] on the home screen. For details on [Useful Apps], refer to Accessing all the function keys.
2
Enter the [Document ID] and [Password] for the secure print document, and tap [OK].
This displays a list of secure documents that match the specified document ID and password.
3
Select the file to be printed.
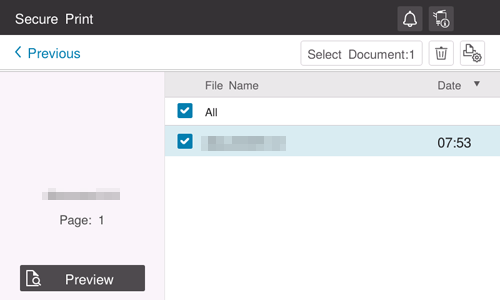
You can select multiple files at once.
You can tap [Preview] to preview the file image.
4
If necessary, tap the Setting icon ( ) in the upper right to set print options.
5
Use the Start key to start printing.
Printing on this machine (Basic style with [Prohibit Functions] set to [Mode2])
If [Prohibit Functions] is set to [Mode2] in [Utility] - [Administrator] - [Security] - [Security Details] - [Prohibit Functions], you need to also enter the password when selecting a file. You need to enter the password for each file even if secure documents have the same document ID. Therefore, the security level is higher than that of default [Mode1].
1
Tap [Secure Print] on the home screen.
The [Secure Print] position varies depending on the customization status of the home screen. By default, access from [Useful Apps] on the home screen. For details on [Useful Apps], refer to Accessing all the function keys.
2
Enter the [Document ID] for the secure print document, and tap [OK].
This displays a list of secure documents that match the specified document ID.
3
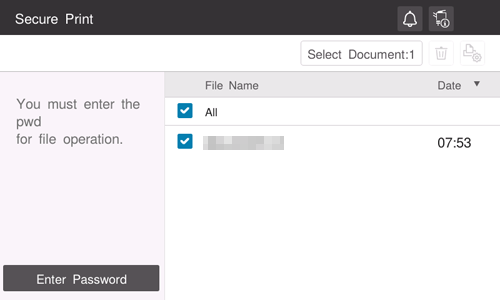
Select a file to print, and also tap [Enter Password].
4
Enter the password for the secure print document, and tap [OK].
If the user cannot enter the correct password within the number of times being set by the password administrator, the selected file is locked out. To release the operation prohibition status, contact your administrator.
5
Check that the desired file is selected.
You can select multiple files at once.
You can tap [Preview] to preview the file image.
6
If necessary, tap the Setting icon () in the upper right to set print options.
) in the upper right to set print options.7
Use the Start key to start printing.
Printing on this machine (Classic style)
1
Tap [Secure Print] on the main menu of classic style.
2
Enter the [Document ID] and [Password] for the secure print document, and tap [OK].
This displays a list of secure documents that match the specified document ID and password.
3
Select a file to print, and also tap [Print].
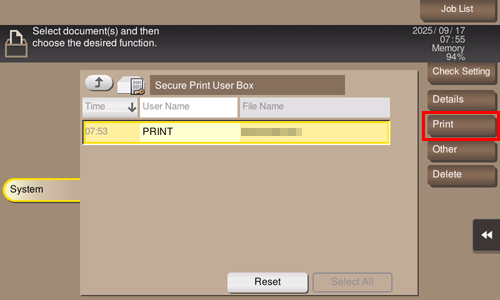
Select a file, and tap [Details] to confirm the detailed file information.
Select a file, and tap [Other] - [Edit Name]. Now you can rename the file.
Select a file, and tap [Delete] to delete the file.
4
Specify print options as needed.
If an output image cannot be displayed, [Preview on Screen] is displayed. To check an output image, tap [Preview on Screen], and confirm the target output image on the preview screen.
For details on option settings, refer to [Print].
5
Use the Start key to start printing.
Printing (Classic style with [Prohibit Functions] set to [Mode2])
If [Prohibit Functions] is set to [Mode2] in [Utility] - [Administrator] - [Security] - [Security Details] - [Prohibit Functions], you need to also enter the password when selecting a file. You need to enter the password for each file even if secure documents have the same document ID. Therefore, the security level is higher than that of default [Mode1].
1
Tap [Secure Print] on the main menu of classic style.
2
Enter the [Document ID] for the secure print document, and tap [OK].
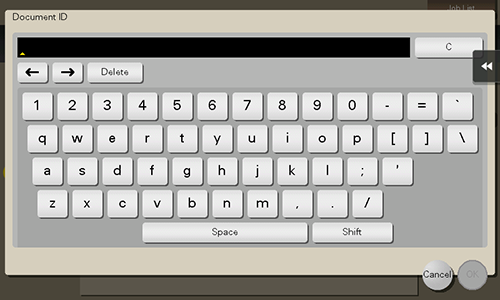
This displays a list of secure documents that match the specified document ID.
3
Select a file to print, and tap [Other] - [Enter Password].
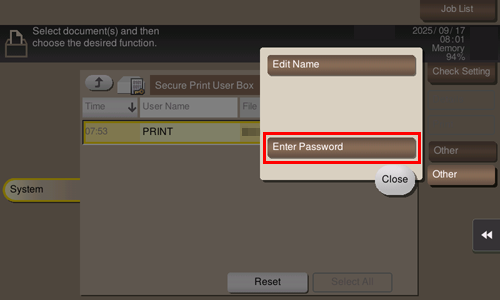
4
Enter the password for the secure print document, and tap [OK].
If the user cannot enter the correct password within the number of times being set by the password administrator, the selected file is locked out. To release the operation prohibition status, contact your administrator.
5
Tap [Print].
Select a file, and tap [Details] to confirm the detailed file information.
Select a file, and tap [Other] - [Edit Name]. Now you can rename the file.
Select a file, and tap [Delete] to delete the file.
6
Specify print options as needed.
If an output image cannot be displayed, [Preview on Screen] is displayed. To check an output image, tap [Preview on Screen], and confirm the target output image on the preview screen.
For details on option settings, refer to [Print].
7
Use the Start key to start printing.
 in the upper-right of a page, it turns into
 and is registered as a bookmark.