[FTP] Screen
Overview
Configure this setting when sending scan data using FTP.
The destination can be selected from the list of pre-registered destinations or entered directly. Additional destinations can also be registered.

- This item is displayed on a product equipped with a scanner and HDD. For details, refer to What Is the [SCAN]?.
- Only 1 FTP destination can be selected. To send data, this destination can also be combined with a destination specified in another sending method.
- It is convenient to pre-register frequently used destinations. For details about how to register a destination, refer to [Scan Address Register].
Specifications
Category | Copy / Scan | ||
Location | Machine | Touch Panel | |
Printer driver | - | ||
Application | - | ||
Required options | - | ||
Required items | - | ||
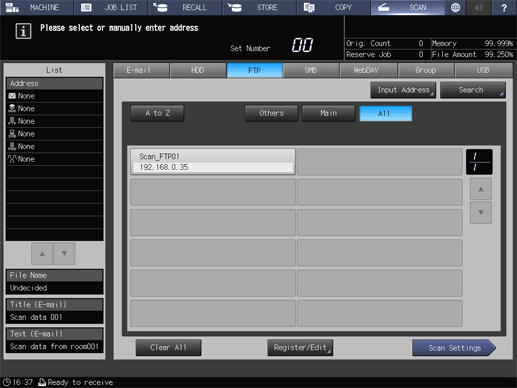
Setting items | Destination key | Displays the registered destinations. Press the key to select a destination. | |
[Input Address] | Manually enter a destination Set this item when sending a job to an unregistered destination. For details, refer to [Input Address]. | ||
[Search] | Searches for the target destination from the registered destinations. For details, refer to [Search]. | ||
[A to Z] | Displays a list of destinations for which [Reference Name] is registered with alphabetic characters. | ||
[Others] | Displays a list of destinations for which [Reference Name] is registered with characters such as symbols other than alphabetic characters. | ||
[Main] | Displays a list of frequently used destinations that are registered in [Main]. | ||
[All] | Displays all of the registered destinations. | ||
[+] / [,] | Switches the destinations list page. Up to 12 destinations are displayed on each page. | ||
[Clear All] | Resets the selected destination. When multiple destinations are selected using certain sending methods, they can be canceled collectively. | ||
[Register/Edit] | Registers, edits, or deletes a destination. For details, refer to [Register/Edit]. | ||
[Scan Settings] | Saves the selected destination, and sets scanning conditions. For details, refer to [Scan Settings]. | ||
Remarks | - | ||
Reference | - | ||
Screen access | Touch panel - [SCAN] - [FTP] | ||
Procedure


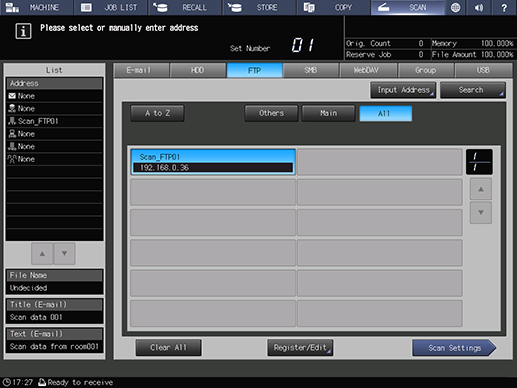
The selected destination is displayed in [List] of the left pane of the screen.
To cancel the selected destination, press the selected registration name again.
Pressing [Input Address] allows you to manually enter a destination. For details about how to enter a destination, refer to [Input Address].
Using the search function allows you to search for a destination. For details about the search function, refer to [Search].
To narrow down registration names, use [A to Z], [Others], or [Main].


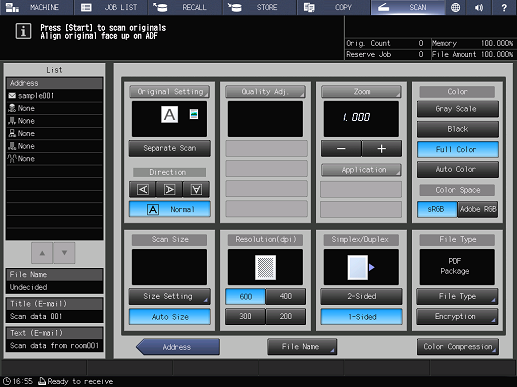
[Original Setting]: Sets conditions for the original. Set the orientation and image quality of the original, and the 2-sided original.
[Quality Adj.]: Sets image quality conditions. Set the scanning density, tone, brightness, contrast, etc.
[Zoom]: Sets the zoom ratio for scanning.
[Application]: Sets application functions. Configure various settings such as erasing the outside of an original or adding a stamp.
[Color]: Sets the color mode. Set the scanner data to color, gray scale, or black and white.
[Color Space]: Select the type of RGB color space.
[Scan Size]: Manually set the range to scan the original.
[Resolution(dpi)]: Sets the resolution to scan the original.
[Simplex/Duplex]: Sets simple and duplex conditions for the original.
[File Type]: Sets the file type or password to store scan data.
[File Name]: Enter the file name for the scan data to send.
[Color Compression]: Sets the compression level for scan data.
For details about the scan conditions, refer to [Scan Settings].

Scanning starts, and the scan data is sent to the selected destination.

 in the upper-right of a page, it turns into
  and is registered as a bookmark.